
Invoice and Sales Form Basics

These tutorials guide you through the basics of Invoices and Sales Receipts in QuickBooks Online. Along with our “First time with QuickBooks Online” series, this article is an excellent starting point for brand new QuickBooks users.
Recording sales is the most important accounting activity for most users. In QuickBooks Online, you send Invoices to customers if you expect to be paid in the future and Sales Receipts if you were paid at the time of the sale.
Here, we will focus on the creation and steps for processing these sales forms, as well as how and when to use associated features in QuickBooks. Watch these videos in their entirety so you feel confident with the fundamentals of QuickBooks Online.
- Setting up for Success with QuickBooks Online – Intermediate Invoicing and Sales Forms
How to Record Your Sales: Reports, Invoices, & More
Below is the basic sales workflow in QuickBooks Online.
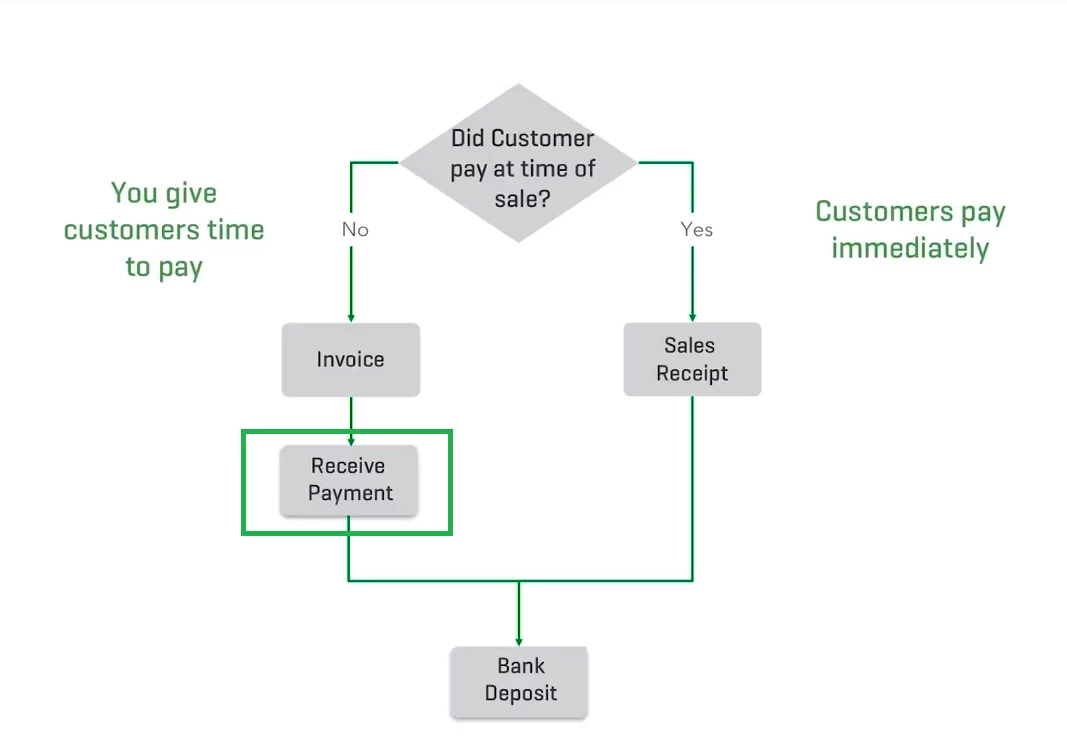
Whenever you make a sale...
- Create an Invoice when you sell a product or service and expect to get paid in the future. Once the Invoice is paid, you receive the payment against the Invoice in QuickBooks.
- Create a Sales Receipts when you sell a product or service and are paid at the time of sale. Since you’ve already been paid, you skip the "receive payment" step.
-
Pay close attention to the receive payment step. This is unique to the QuickBooks accounting workflow. You must receive payments against an Invoice in order to accurately process and deposit that money into an account.
While many users may be new to QuickBooks, they are not new to business. In most cases, new QuickBooks users will have hundreds of historical transactions they'd like to enter into their accounts on day one. Sound like you?
For those historical transactions that have already been paid by customers, enter them as Sales Receipts. For upcoming customer sales that have yet to be paid, create Invoices. When you first create a new account in the Chart of Accounts, you also have the option to set the opening balance. While having an opening balance won't provide transaction details, for reporting and tracking purposes, your totals will be accurate.
How to Set Up Products & Services: Organize & List
Before you start sending Invoices or recording sales, you need to create your Products and Services list. We go over this in greater detail in “Your First Hour with QuickBooks Online,” but the basic process is outlined in the video.
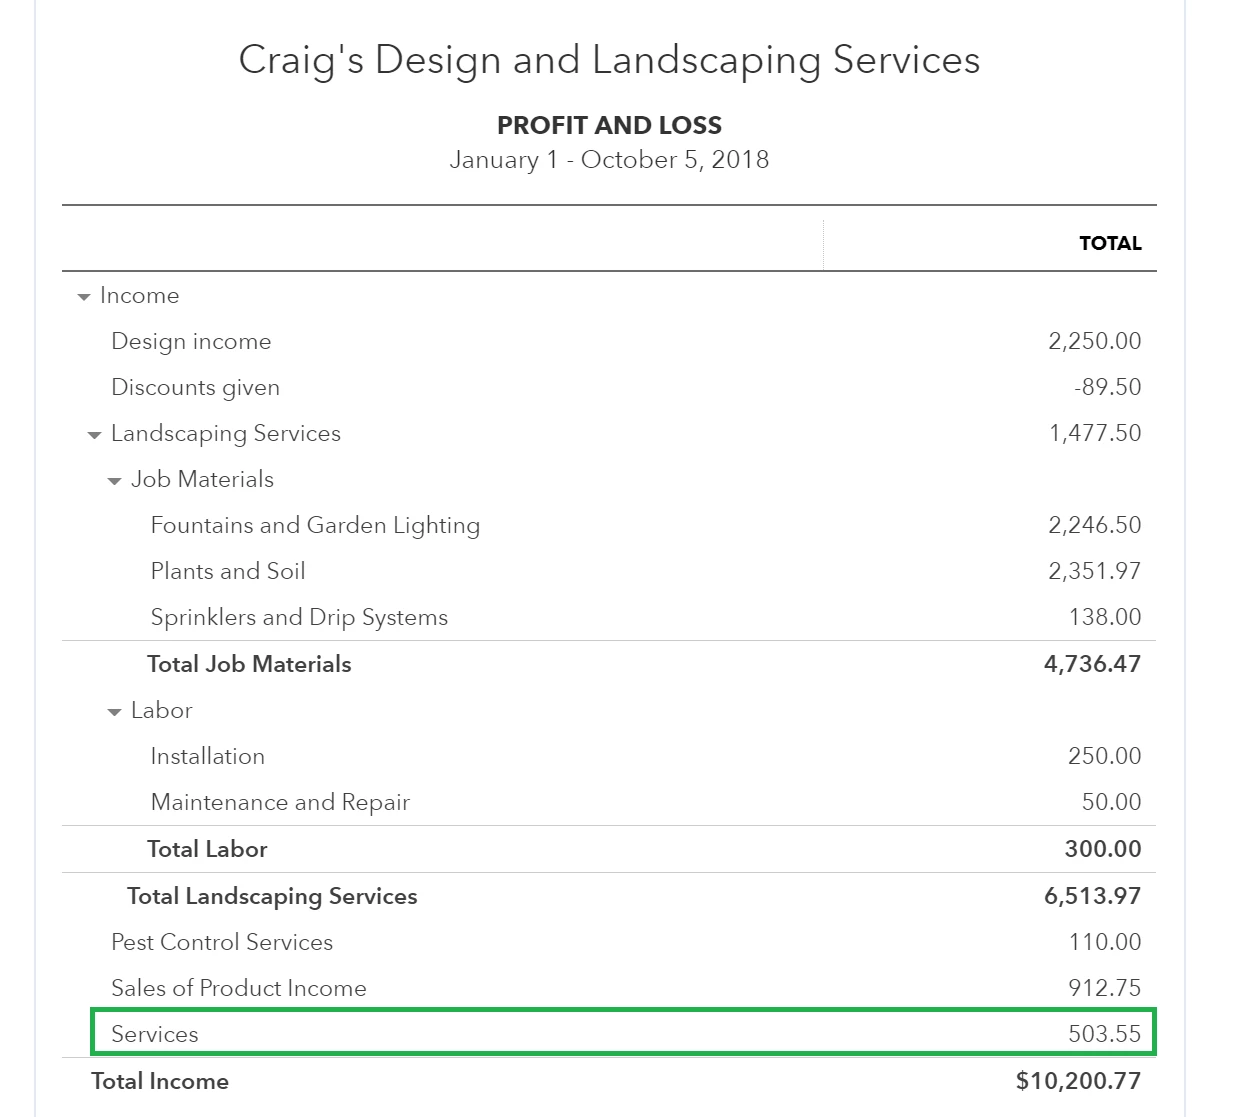
When you create a product or service, you need to designate an income account. Keep in mind, the income account is used to record the income from the sale of the product or service. This account is not where the payment for the sale ends up - that comes later.
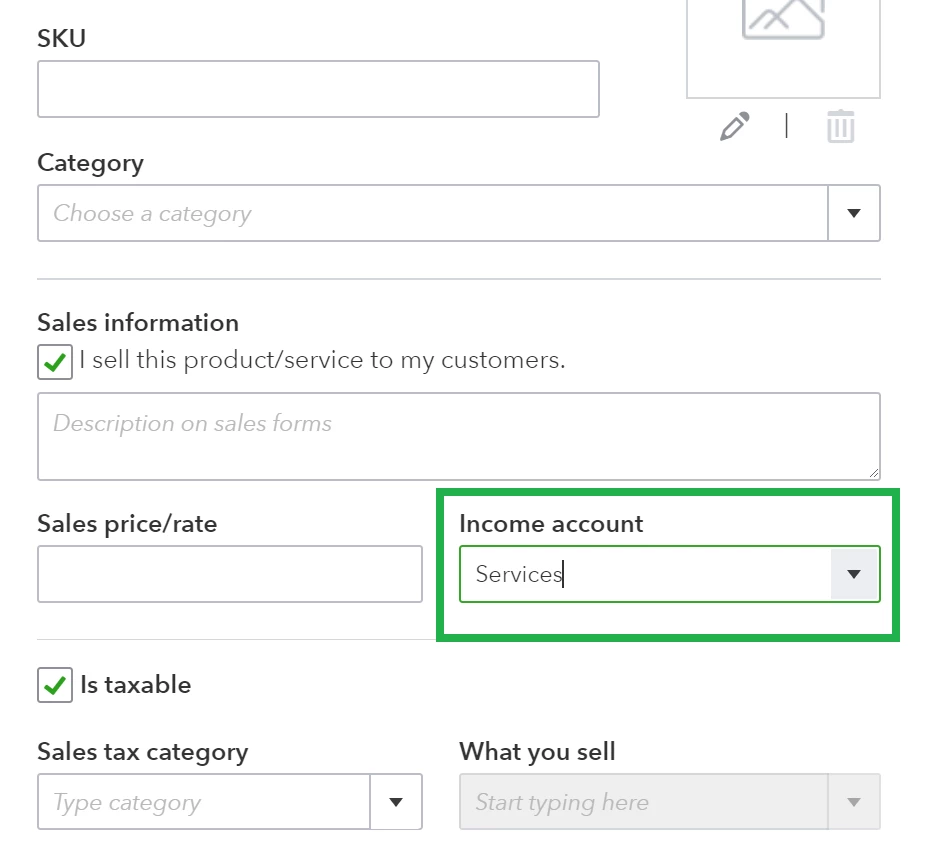
Each time you sell an item, the income is distributed into the specified income account so everything stays organized on your Financial Reports.
As we mentioned, income accounts are separate from accounts you receive customer payments into. You decide which account the actual payment is deposited into during the “Receive Payment” step (see below). This may seem unclear, but for now, just keep in mind that these accounts are different.
How to Record a Customer Invoice
Now that you know the basic workflow, you can confidently create a new Invoice or Sales Receipt.
The instructor in the tutorial already has product and service items entered into QuickBooks so he doesn’t have to create them on the fly on the Invoice form. If you have the time, do a complete setup of your most popular products and services so you don’t miss any crucial details.
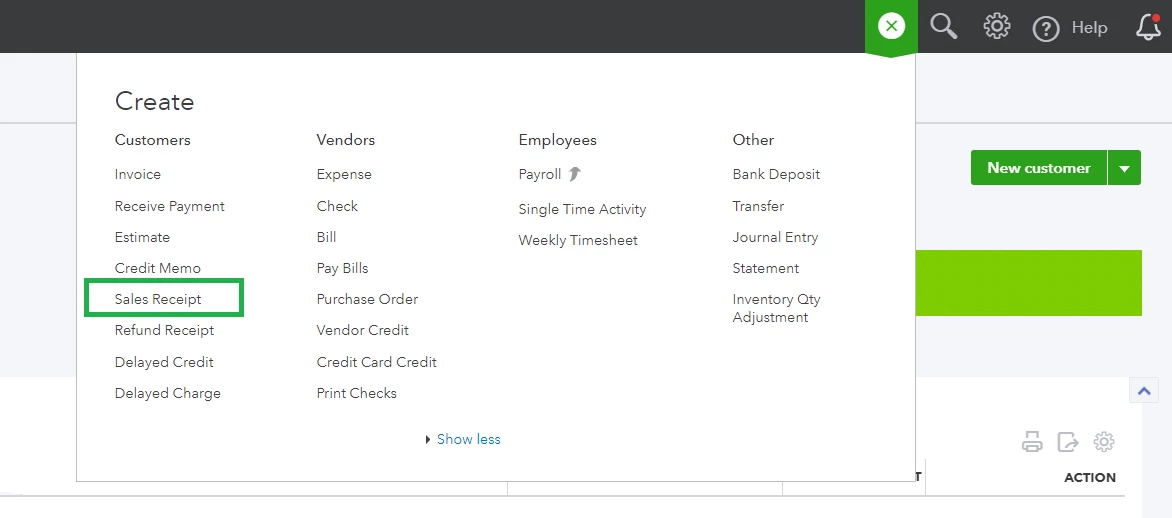
You will notice right away that there are several ways to create a new invoice in QuickBooks Online. Here are a few common paths:
- The simplest and most frequently used path is to click the Create Button (
 ) and select Invoice.
- In the Sales Tab, you can click "create Invoice" from the customer list so their information is automatically added to the form.
- You can (and should always) convert Estimates into Invoices in the Sales Tab so you're working from the same transaction throughout the sales cycle.
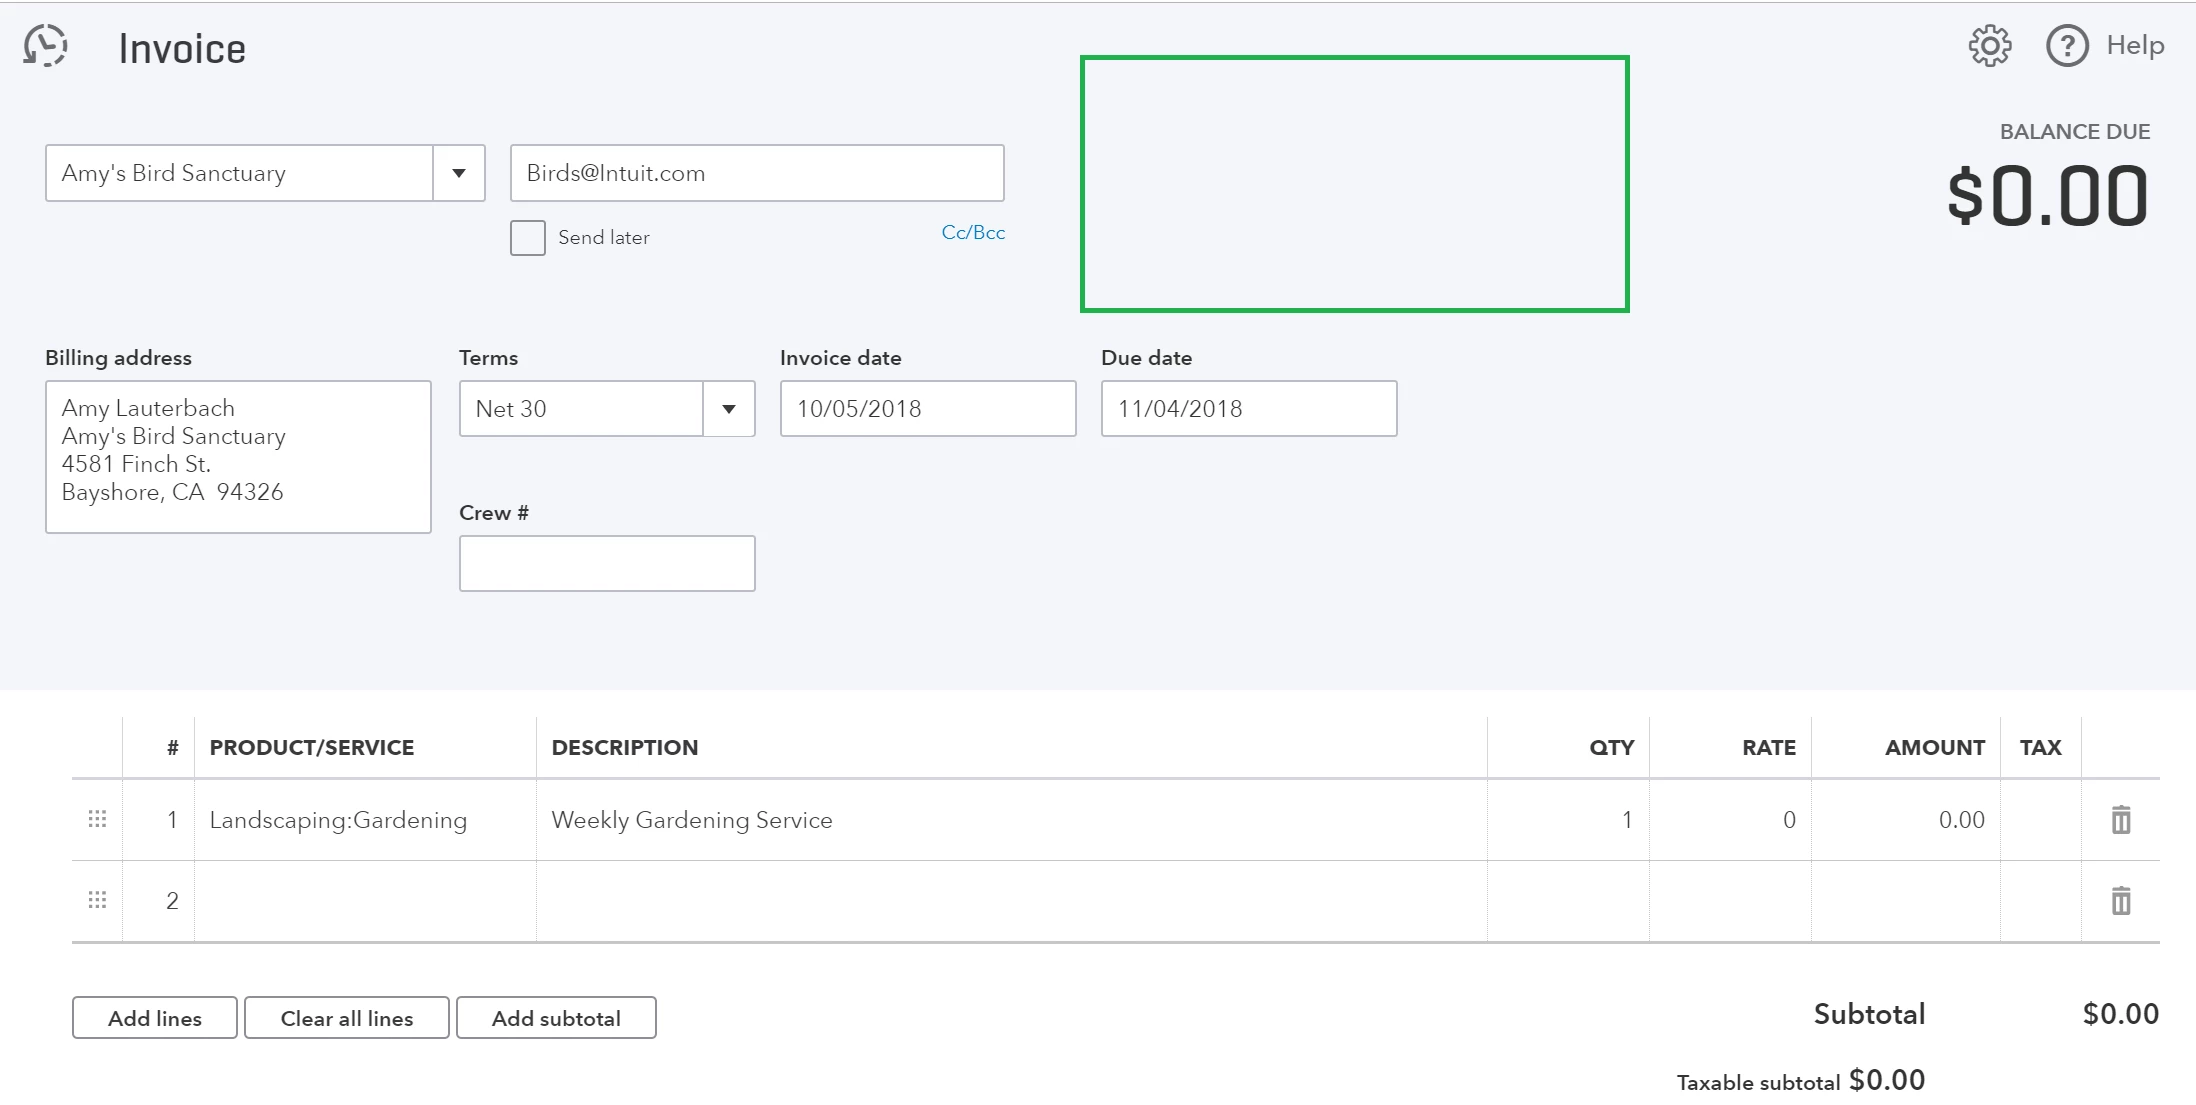
You may also notice that your first invoice looks a bit different from the one in the video. By default, electronic invoice payments are not enabled since this requires signing up for our payment processing services.
While you generate Invoices in QuickBooks Online, many users process payments via credit card or external third-party applications like PayPal. This works perfectly fine, so long as you remember to finish processing the Invoice in QuickBooks.
Whether you choose an external service or sign up for QuickBooks Payments (which drastically reduces data entry, and ACH transfers are free), the basic workflow is nearly identical – send an invoice, receive the payment, and then deposit it into an account in QuickBooks.
The narrator spends quite a bit of time on the date, due date, payment terms, and other details. Invoices and Sales Receipts are customer facing, meaning that when you hit “Save and Send,” your end customer will receive a copy, so be sure that everything is correct before you hit send. remember that you can always select “Save and Close” to finish your work later on.
The toolbar at the bottom is also chock-full of useful features. You can use the Customization Module to spruce up the visual design of Invoices or add or remove data fields on sales forms (in the case of the video, they mention adding a Qty field).

You probably won’t use these on a daily basis, so once you’ve gotten settled into the program, spend an hour exploring how these features that can significantly enhance your workflow.
For cases where your customer has already paid you and you’re recording the transaction at the time of or shortly after the sale, you can create a Sales Receipt.
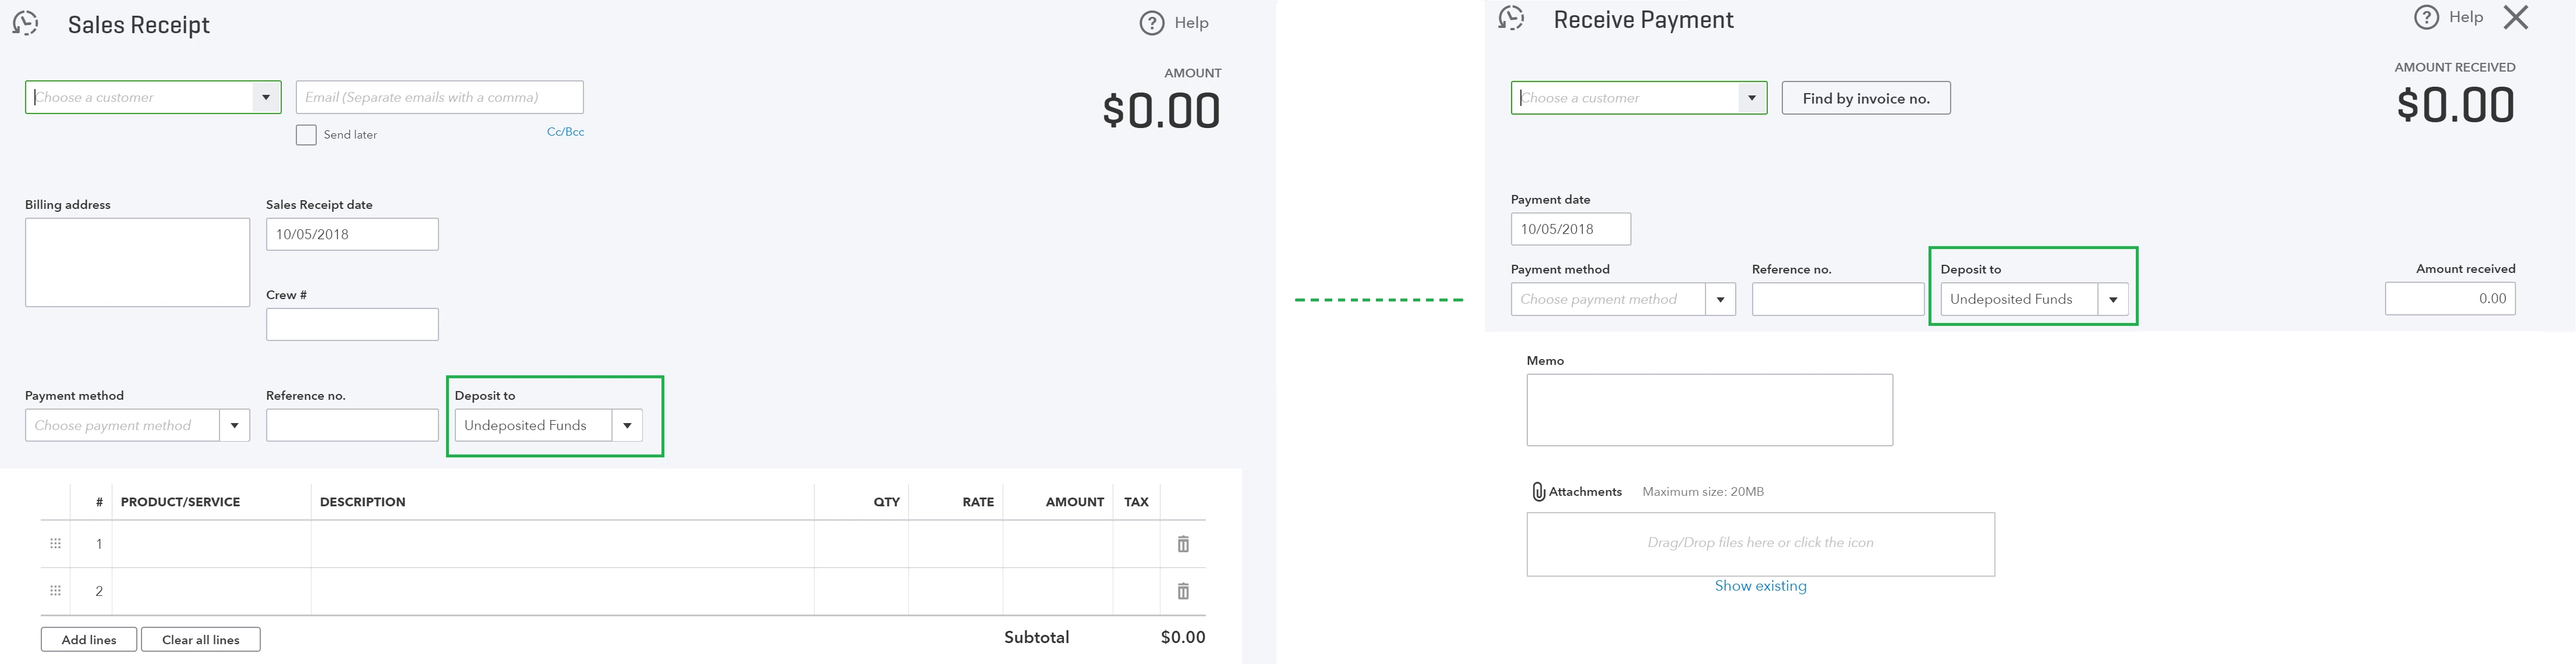
You will notice right away that Sales Receipts are nearly identical to Invoices. The key point in the tutorial is the “deposit to” step. This is not an option on Invoices, but it does appear on Sales Receipts and is very similar to the "receive payment" step of Invoicing.
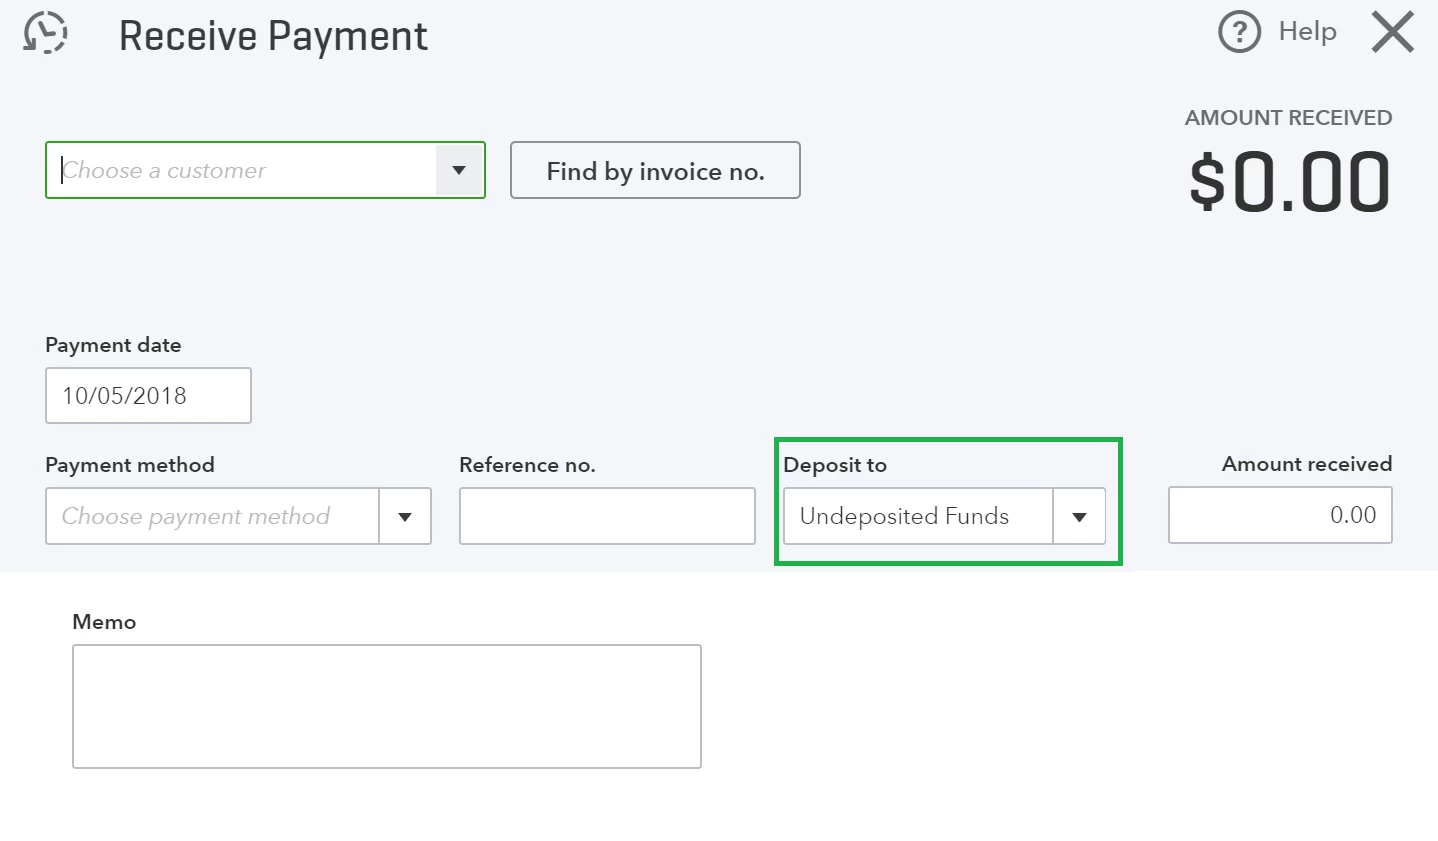 In many cases, such as with credit card payments, you can select your "checking account" since the actual payment is already (or will soon be) directly deposited into your checking account.
However, if you plan to deposit cash, checks, and several payments at once into your bank’s checking account, you need to use the Undeposited Funds account. This is essentially a holding account you can use to group multiple transactions together to mirror your bank actual deposit. Individual payments sit in the Undeposited Funds account until you're ready to add them to your income accounts with the Bank Deposit feature.
For example, if you have two separate transactions in QuickBooks for $50 each but you made a single $100 deposit to your bank, you’d want to deposit the two transactions to your Undeposited Funds Account and then process them together.
This way, when you reconcile your accounts at the end of the month, you’ll always have an exact match. While it initially seems like extra work, the Undeposited Funds account is a very useful organizational tool (and safety net to help you manage payments) when you’re dealing with hundreds of transactions every day.
How to Record Invoice Payments
The Receive Payments step is where most new QuickBooks users run into challenges. Even if you are processing payments outside of QuickBooks, you need to follow the Receive Payment workflow so all of your transactions are processed the same way.
You may hear some people talk about “accepting payments against an Invoice” or “closing out an invoice.” This essentially means matching payments to an existing Invoice. Remember, you don’t need to receive payments if you are creating a Sales Receipt because you were already paid at the time of sale.
If you skip the Receive Payment step and hold onto Invoice (A) for $100, but make an unmatched $100 deposit to your checking account, Invoice (A) would remain open on your books. This would impact your Accounts Receivable (A/R) total and double count your income - you would have $100 waiting to be processed in you’re A/R and $100 already recorded to your checking account!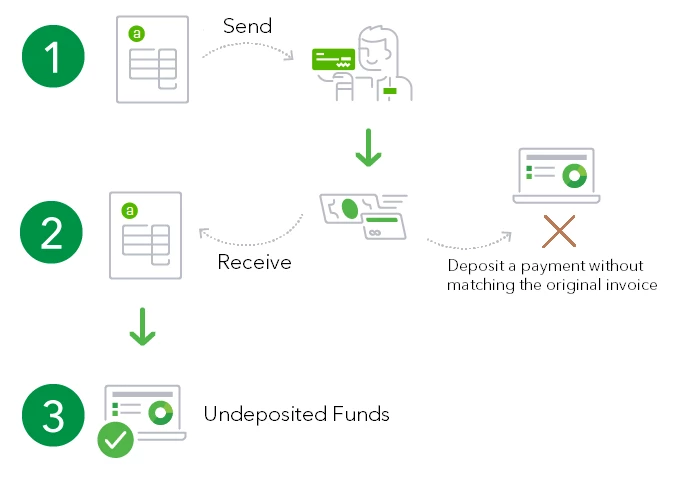
Match the Payment Method and follow the Deposit to step as close as possible. As we mentioned in the previous section, the Undeposited Funds Account is a crucial tool for both Sales Receipts and received payments Invoices since it allows you to hold payments until they’re physically deposited into bank accounts and you can match the records as accurately as possible.
Of course, if the Invoice payment is already in your bank account and does not need to be combined with other payments, you can deposit it directly into another account in QuickBooks.
If you need to double check your work, use the information in the Customer Tab to check your customers’ outstanding balances.
How to Record Bank Deposits: Invoices & Sales Receipts
The Bank Deposit feature lets you deposit multiple Invoices and Sales Receipts from various sources into a single entry so they “match” however they were recorded in your bank or credit card accounts. This feature is used when you deposit invoice or sales receipt payments into Undeposited Funds.

If transactions were recorded by the bank individually, you can record them the same way in QuickBooks. If you deposited multiple payments into the bank at once and they end up on a single bank deposit slip, you want to mirror this process and match all the relevant Invoice and Sales Receipts payments in QuickBooks. This will make monthly bank reconciliations much easier.
The area to pay close attention to is the “Select Payments Included in this Deposit” section. This is where you will see all payments currently sitting in your Undeposited Funds account. If a payment is not in the Undeposited Funds account, you will not see it here since you’ve already deposited it somewhere else.
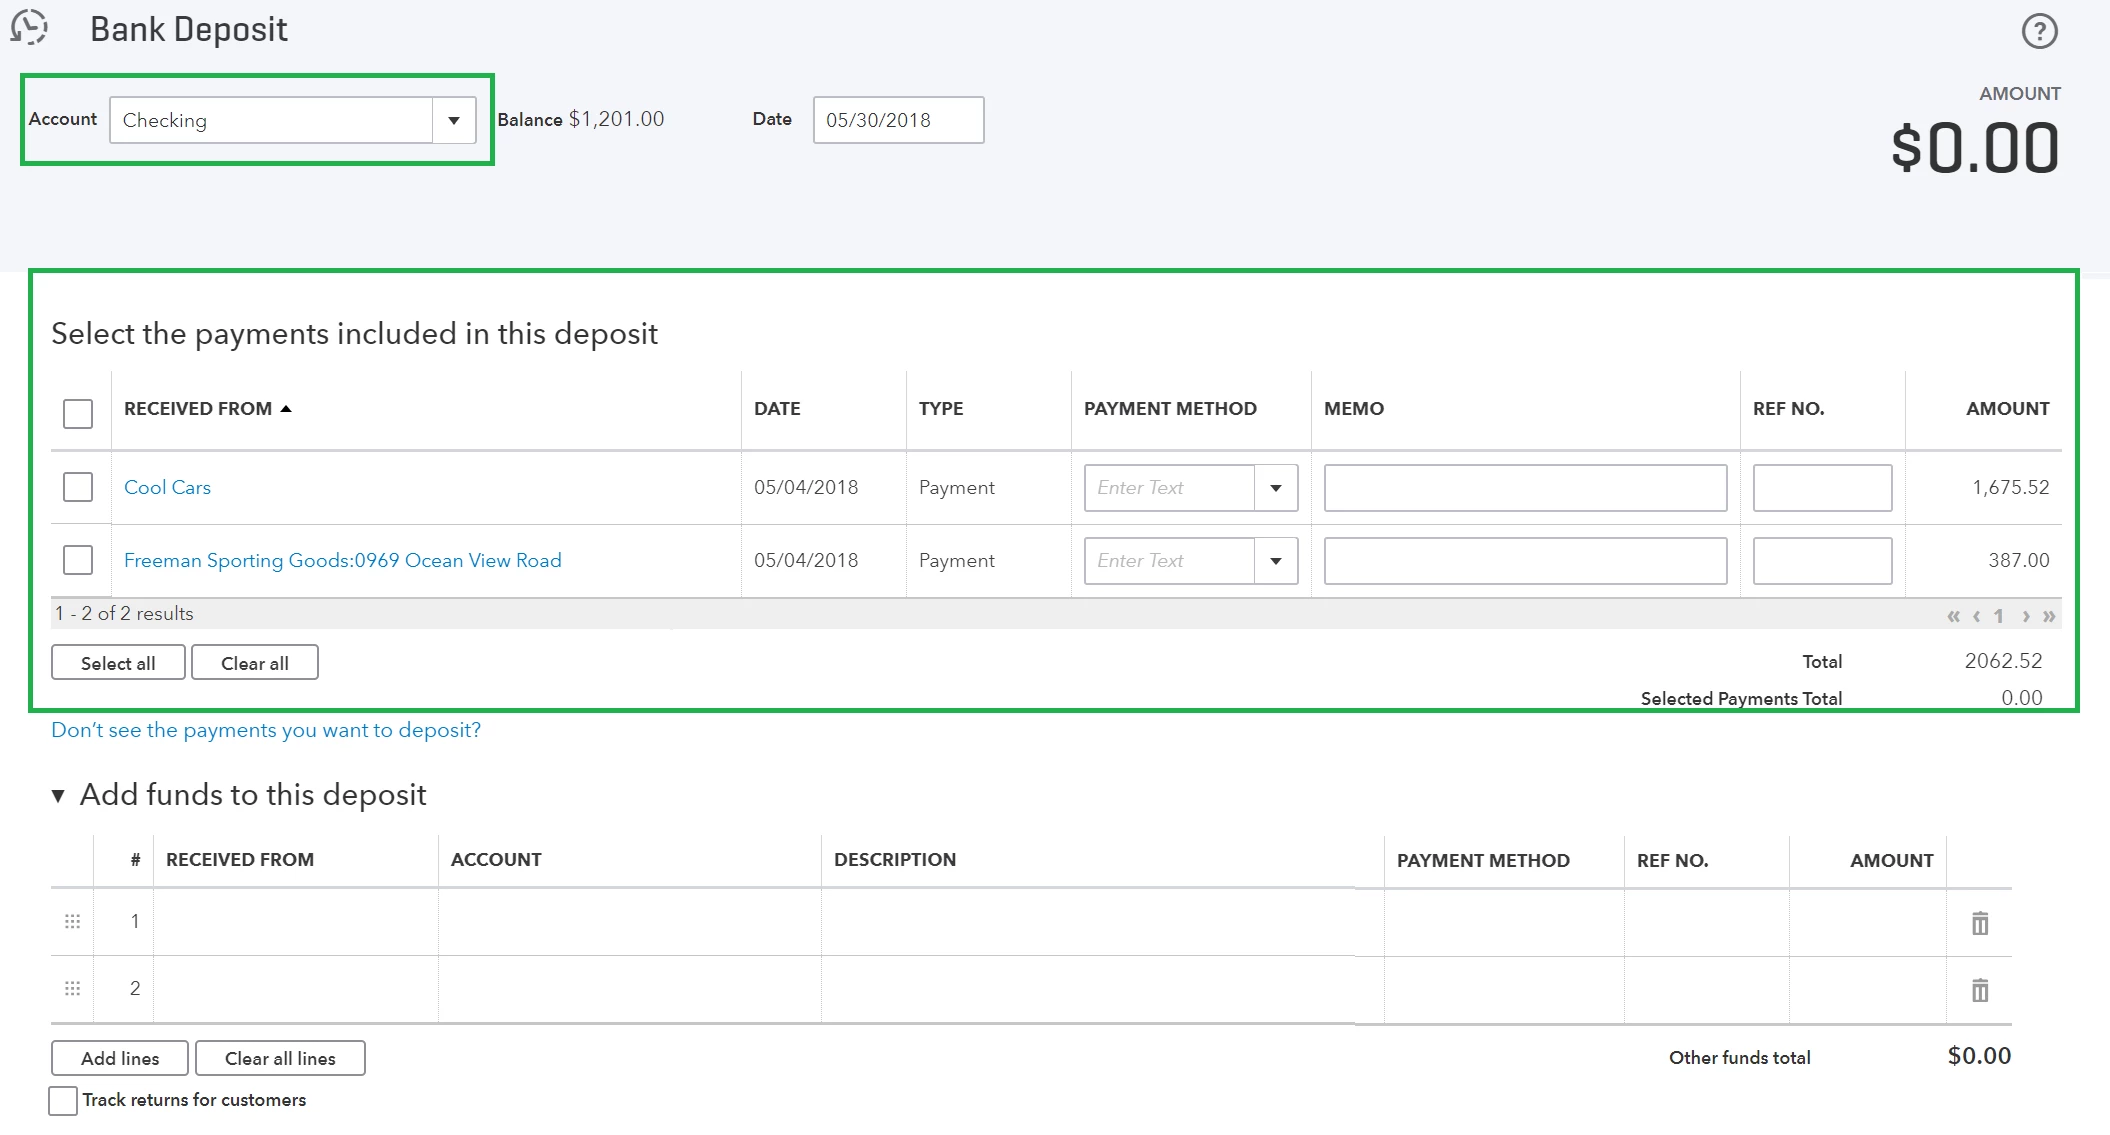
At the bottom of the page, you will notice a section titled “Add Funds to this Deposit.” This is where you can add additional transactions, such as bank fees or interest that are not part of the original deposit but are a related expense created as a result.
Learn everything you need to be successful
- How to Use the Undeposited Funds Account in QuickBooks Online
- How to Record Bank Deposits in QuickBooks Online
Set up for Success in QuickBooks Online
- Adding Items, Customers and Products to Lists
- Financial Reports and Reporting Features
- Creating and Managing Accounts
Check your progress
