
Your First 15 Minutes with QuickBooks Online
Your First Time with QuickBooks Online is geared towards first-time QuickBooks users who want to get started bookkeeping right now. These articles cover all of the setup and accounting workflows you need to know for a comprehensive setup, guiding you from your initial sign up through your next financial quarter and beyond.
While we recommend specific time-frames for completing each task, always go at a comfortable pace - it's worth taking the time learning how to do things the right way. What's most important is following the steps and series in order. If you prefer a task-based or feature-specific approach, check out our series “Setting up for Success with QuickBooks Online."
Welcome to QuickBooks Online!
We're going to set your business up for accounting success from the start. Before you start sending invoices, however, there are a few decisions you'll need to make about your accounts and associated preferences.

Minute 1: What happens in QuickBooks Online should reflect real-life
This guidance comes right from our official trainers who have years of product and accounting experience - actions taken in QuickBooks Online should reflect actions taken in real-life.
This applies to everything, from transactions to recording sales to making bank deposits. While some accounting tasks start within QuickBooks, such as sending invoices (you can also accept payments in QuickBooks), much of what you will record reflects activities done outside of QuickBooks, such as making bank deposits.
In sum, QuickBooks records the accounting aspects of your business activities, but it does not always initiate the literal processes that run your operation. Whenever you process a credit card payment through your POS, pay your employees using QuickBooks Payroll Services, or take out a loan from the bank as a liability to your business, make sure your accounting reflects each step of each process as closely as possible. That means matching names, dates, payment methods, and totals against whatever is recorded on your actual bank or credit card statements.
Keep this in mind going forward and you will have great accounting success!
Minute 2: Enter your Company Information
(Gear Icon [ ] > Account and Settings > Company) ] > Account and Settings > Company) |
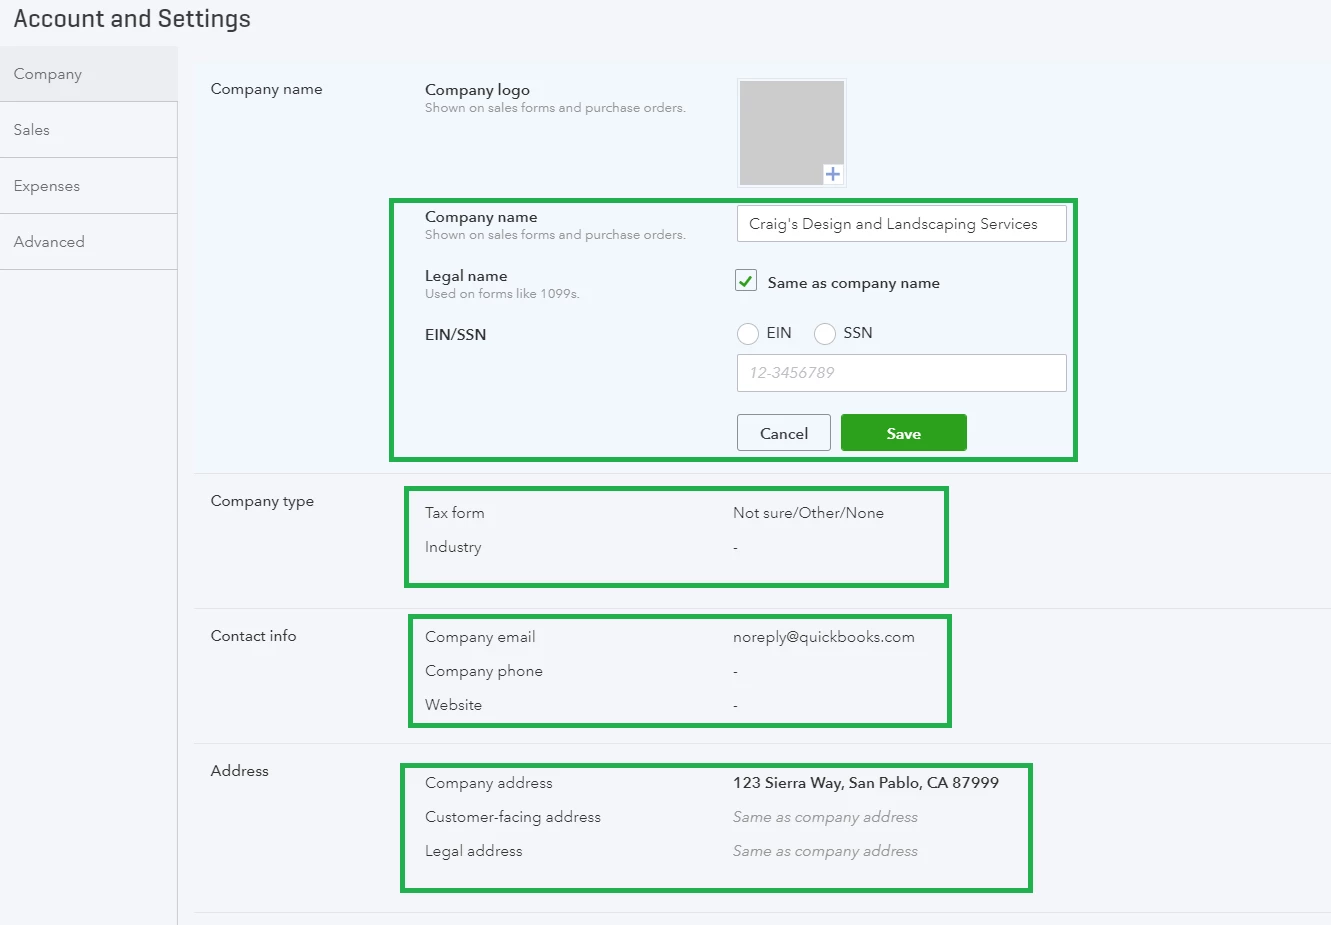
Before entering any transactions into QuickBooks, enter your complete company information. This information automatically populates on the Invoices and sales forms you send your customers, so accuracy is essential. In your Accounts and Settings menu, check the following:
- Company Name
- Business Address (you can also add a PO Box as the “Customer Facing” address, as long as your legal business address is also in QuickBooks)
- Email Address
- Website
- Phone Number
If you need to edit any of this information, click the Pencil Icon ( ) in the corner and click "Save" once you're done with a section.
Next, ensure the designated company type and the tax form you plan to file at the end of the fiscal year are accurate.
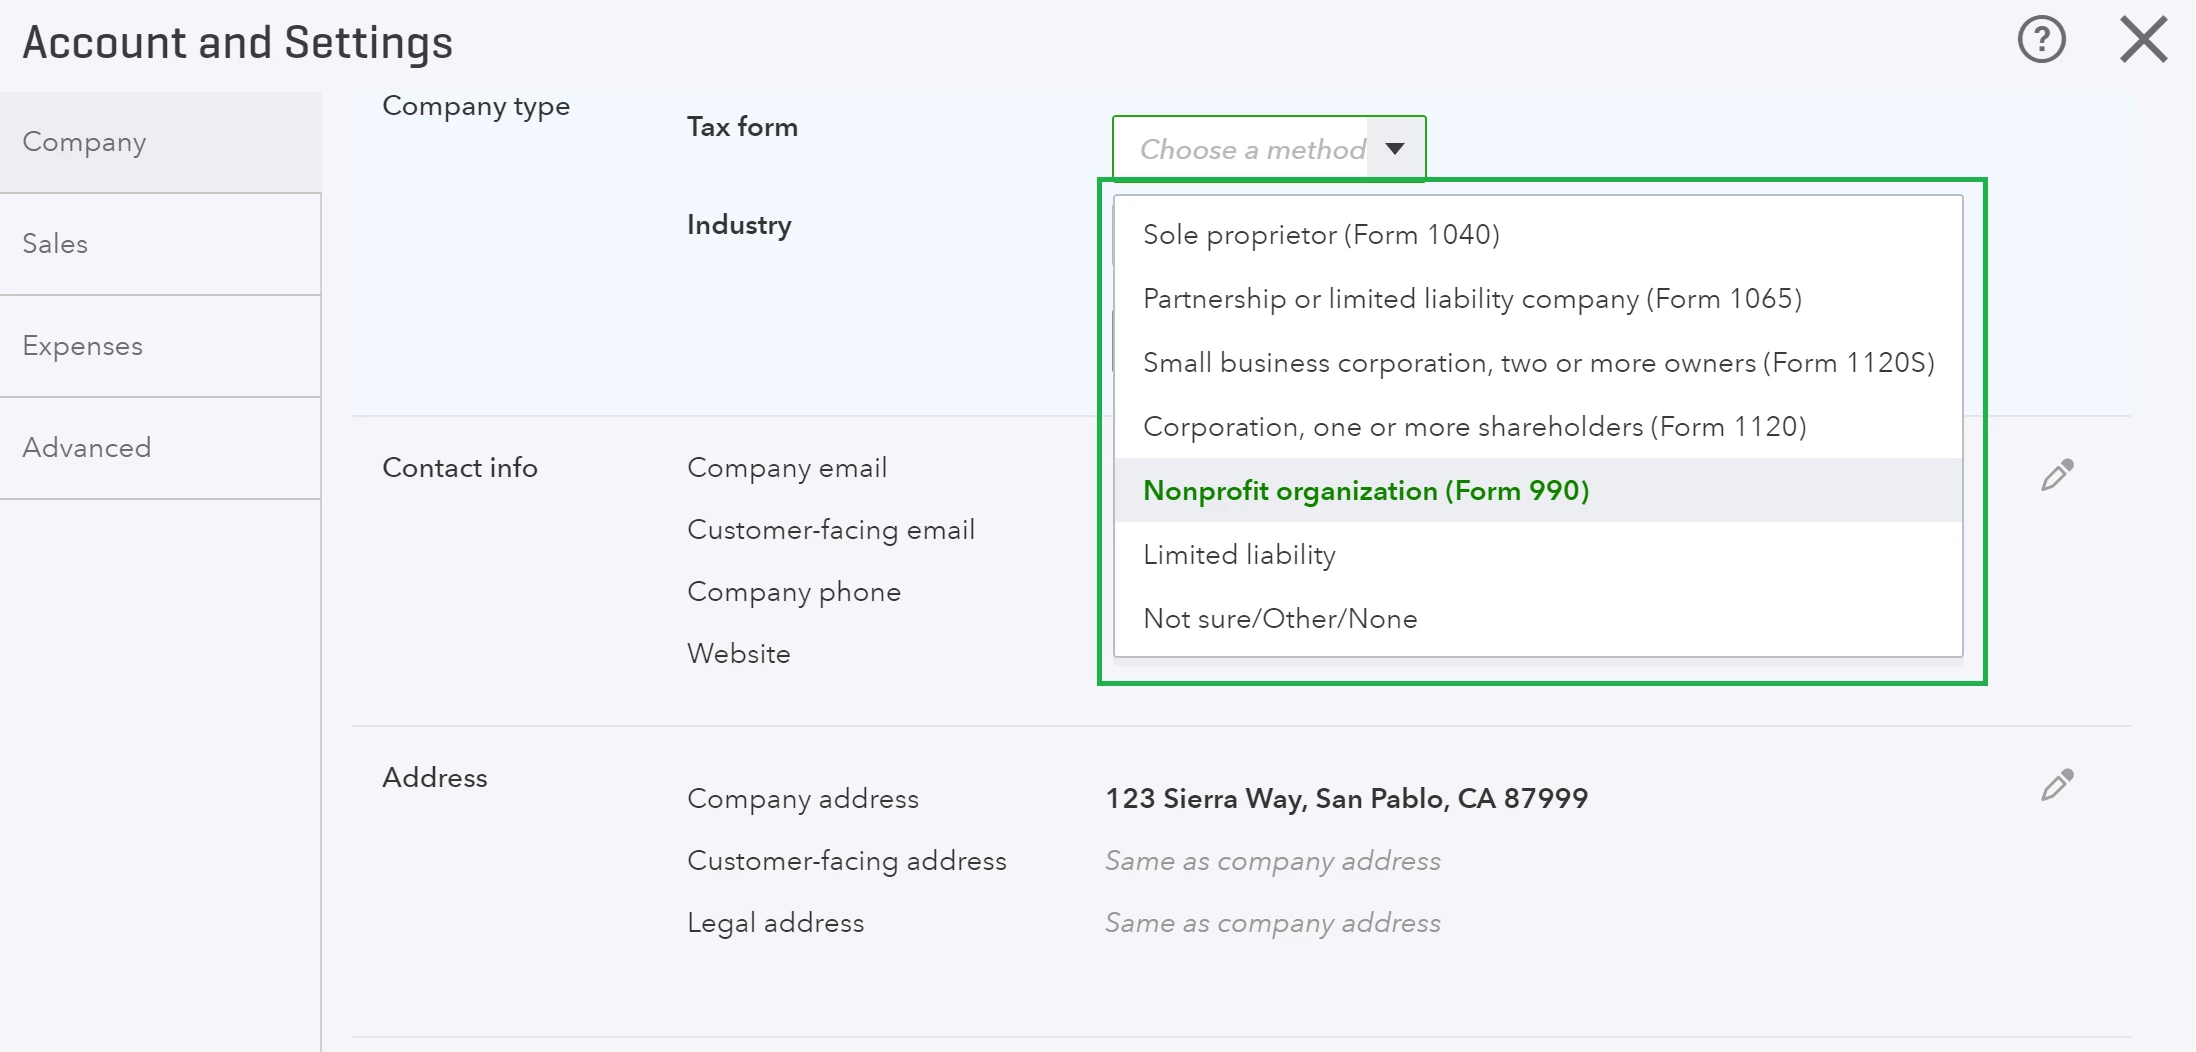
You also need to include your Employer Identification Number (EIN) or Social Security Number. This is a legal requirement - if you need help determining which of these you need for your business, reach out to your accountant or the IRS.
Minute 4: Designate your fiscal year start date
| (Gear Icon [] > Account and Settings > Accounting) |
Tell QuickBooks when your business’ fiscal year begins (and ends). For most businesses, January is the first month of the fiscal year (same as the start of the income tax year). You as the business owner should know your tax year schedule.
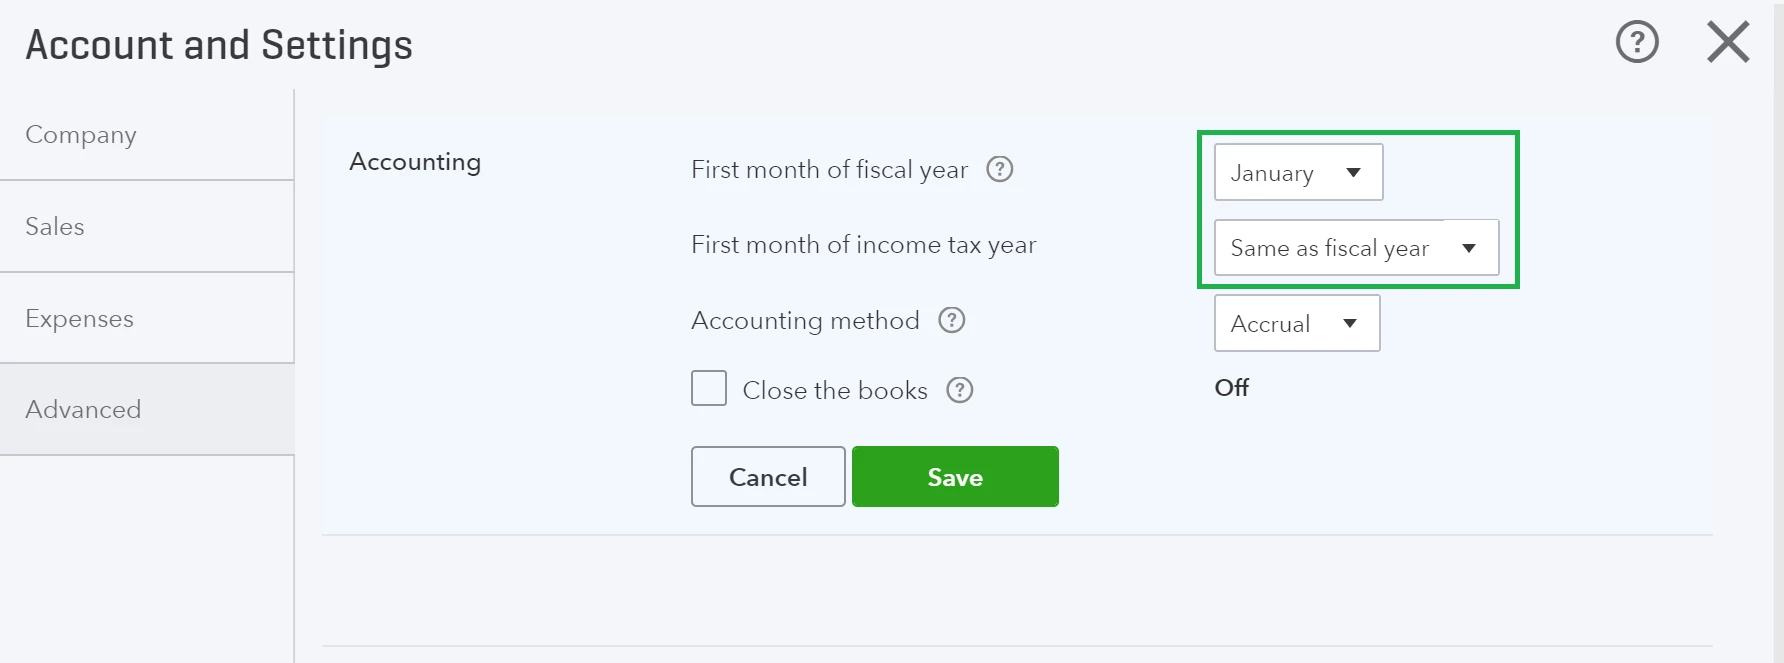
While you're here, you can also set a date 12 months from your start date to “close the books” for the fiscal year. This feature prevents anyone from tampering with your QuickBooks data as you prepare for tax filing, but you can set this later on.
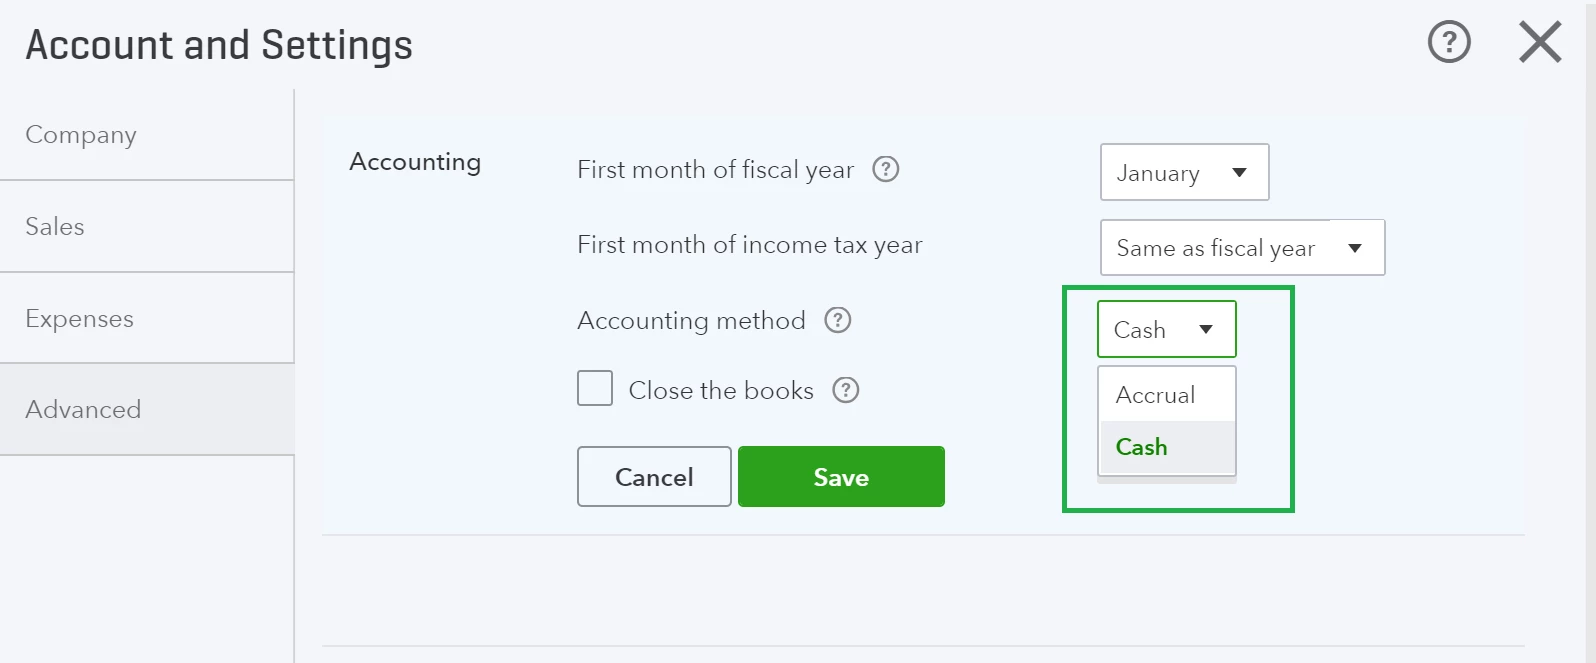
Minute 5: Choose your accounting method: cash or accrual
| (Gear Icon [] > Account and Settings > Accounting) |
From this same menu, tell QuickBooks if your business will use the cash or accrual method for reporting income. Many new businesses choose cash method accounting. Cash method is arguably easier since you only track income and expenses as they are received and paid, but there are advantages to both methods.
To learn more about accounting methods, check our entry in the QuickBooks Encyclopedia. Deciding which accounting method is best for your business is a big decision. Once you start using one method, it’s difficult (but not impossible) to switch to another. If you want recommendations, ask others in the community or consult with your accountant.

Minute 6: Select your accounting currency
How are you doing on time? There's a lot of information here. If you need to, take a step back or ask a question in the comment section below.
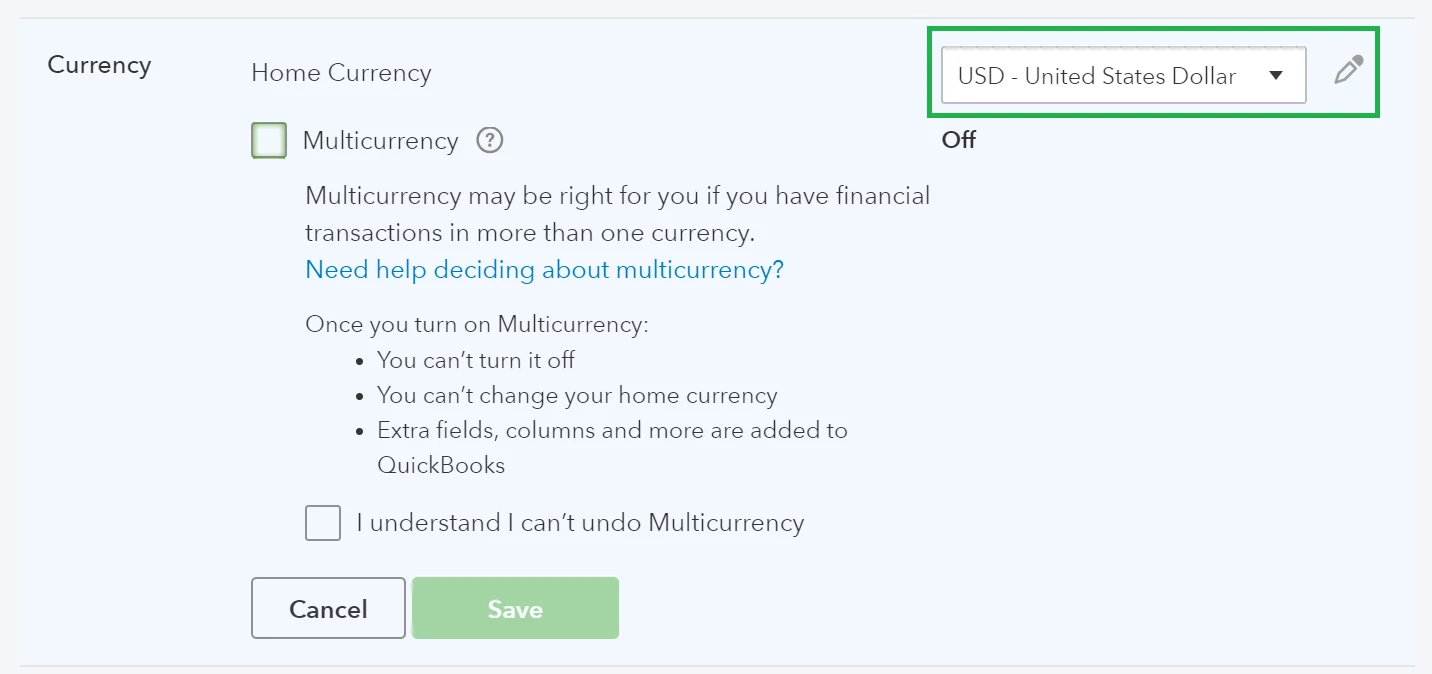
| (Gear Icon [] > Account and Settings > Advanced > Currency) |
We’re almost done with settings. Ensure the selected home currency is the one you plan to use to accept payments from customers. Just as the name implies, multicurrency lets you track transactions in foreign currencies. You should only use this feature if you have bank accounts, customers, or vendors that don’t use your home currency.
|
|
 ) Important - If you plan to use the Multicurrency feature, make sure you have your home currency is selected first. Once you've enabled the Multicurrency feature, you cannot turn off or change your home currency. As ProAdvisor and QuickBooks Online expert
Minute 7: Select your company logo
| (Dashboard or Gear Icon [] > Account and Settings > Company) |
With all the essential administrative work out of the way, we can start personalizing your QuickBooks experience.
Your logo is your visual brand. It’s a statement about you that shows up on all your invoices, estimates and sales receipts you send to customers. Let’s make this professional statement as high-quality and eye-catching as possible:
|
Quick Tips:
|
We will go over invoice customization in greater detail during your first Hour with QuickBooks Online, but if you want to get a jump start on personalization, follow our guide "How to Customize Invoices in QuickBooks Online."
Minute 8: Set your default "Net Payment" invoice terms
| (Gear Icon [] > Account and Settings > Sales > Sales form content) |
We’re gearing up to send your first Invoice. Let’s make sure your customers know when they have to pay you. You can set your default “net payment” invoice terms in the account and settings menu – which you’ve probably noticed is where you make most general changes to your account.
If you want to get paid right away, select “due on receipt.” Otherwise, select an appropriate timeframe from the drop-down. If you click “+ Add New” in the drop-down, you can create custom payment terms and even apply discounts for early payments (more on that later).

The net payment terms you set in this menu will become the default, but you can always change the terms for individual Invoices directly on the form.
We will come back to the settings menu a little later, but feel free to explore a bit if you see something you want to enable.
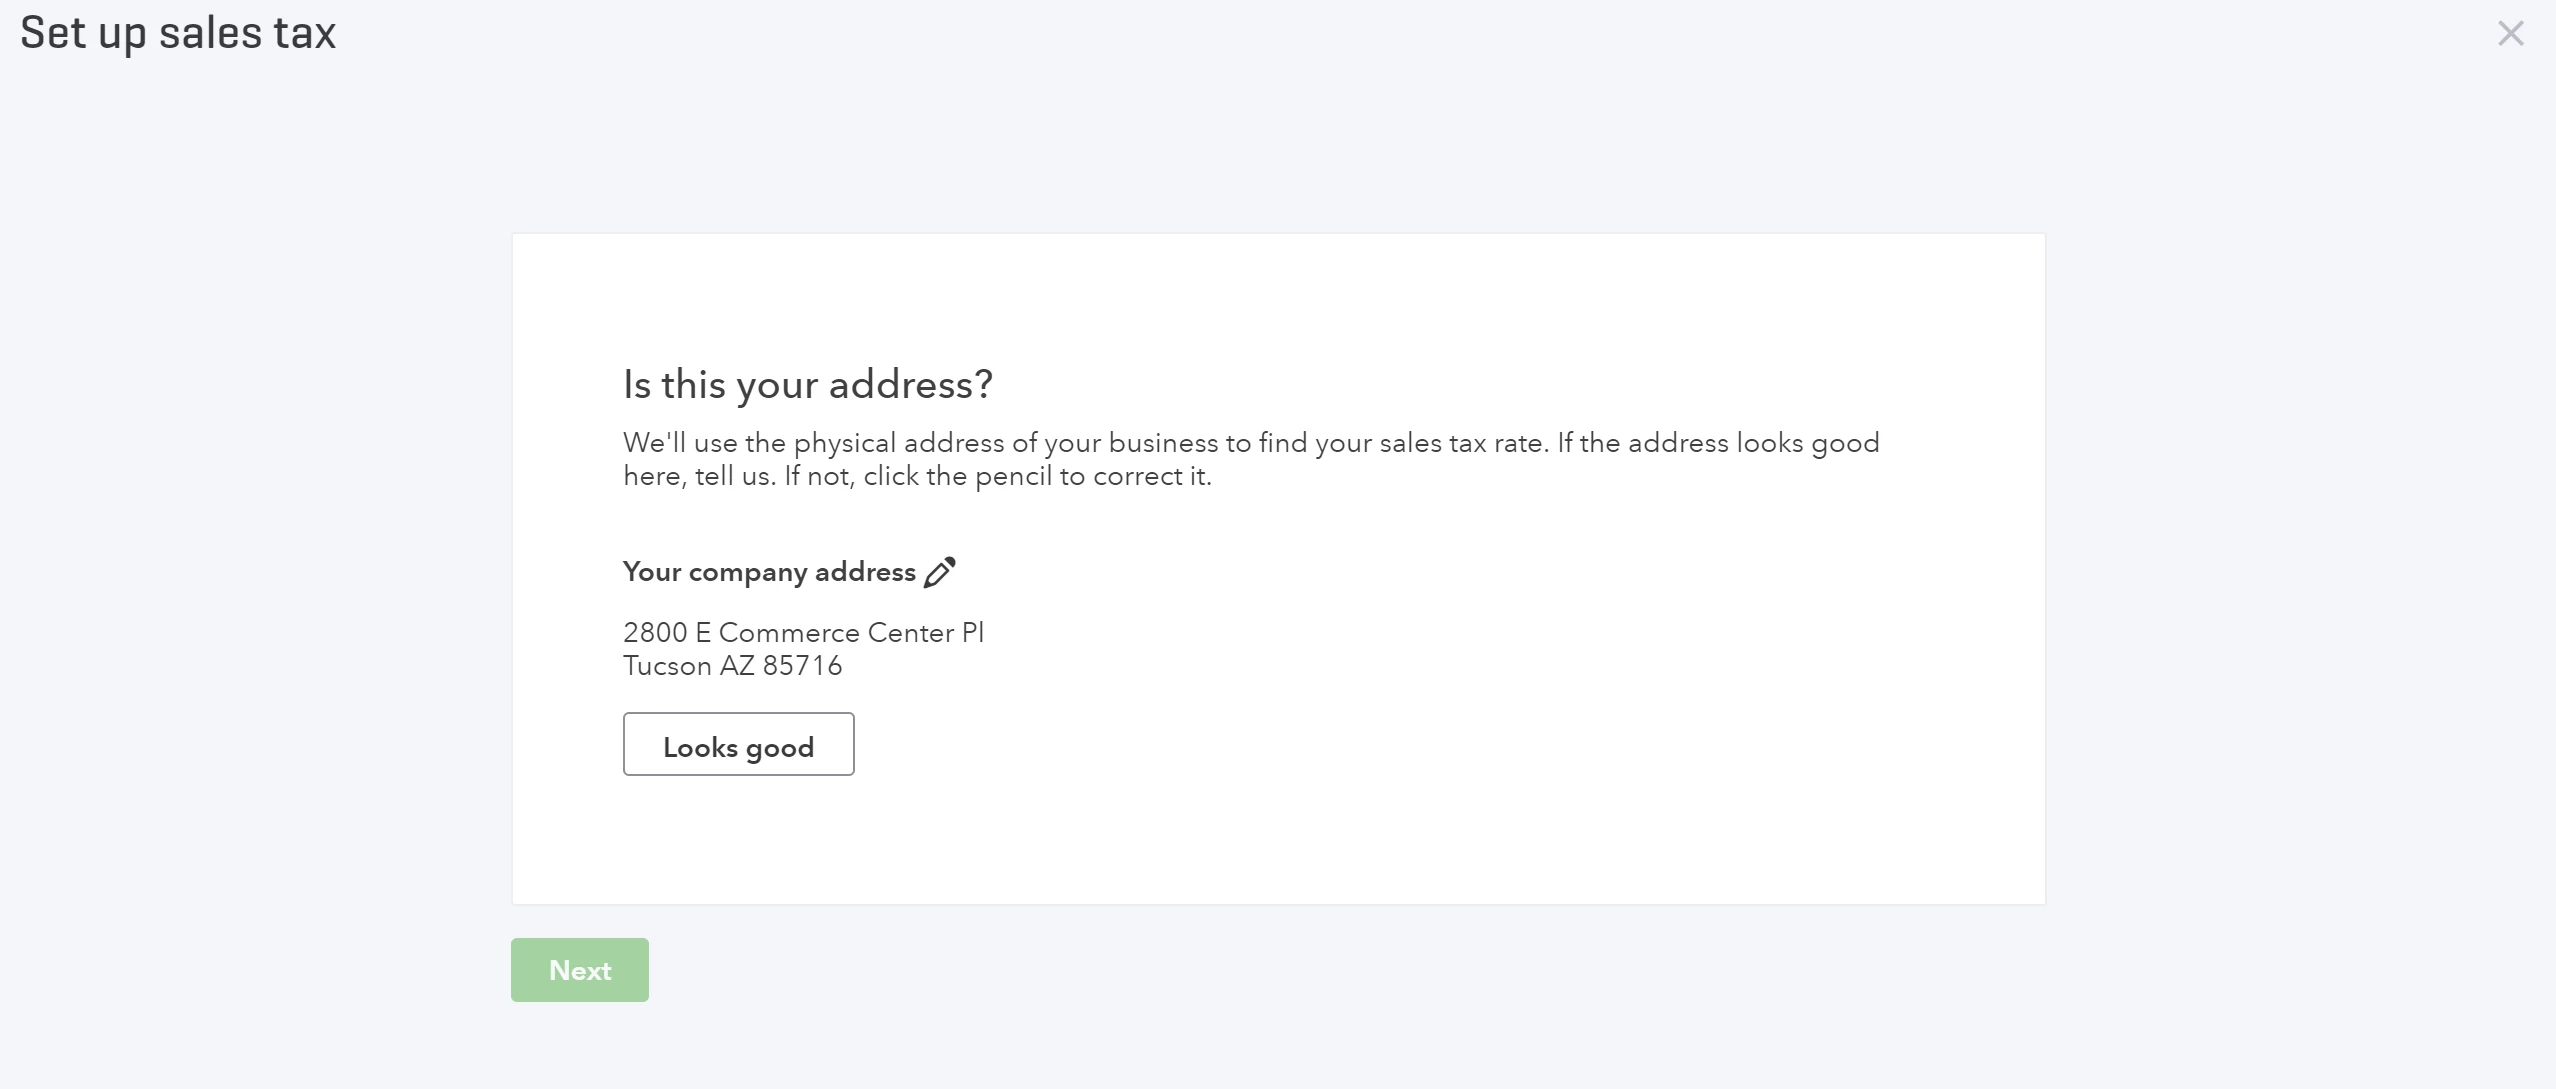
Minute 9: Set up Sales Tax
| (Tax Tab) |
If you’ll be selling products, you need to collect sales tax (in most states). Before going any further, make sure you have your accounting method set (steps above). The first time you set up your account and click the Tax Tab, you’ll be guided through a setup module asking about where you sell your products.
This step is very important – currently, the Automated Sales Tax Center feature in QuickBooks Online only calculates based on the accrual method, regardless of company accounting preferences. If you are new to QuickBooks Online and you...
|
|
Essentially, you'll need to decide whether you want QuickBooks to use the information you’ve provided to automatically determine your state tax agency and calculate sales tax. Once you input your tax period start date and filing frequency, this feature is permanently set.
You may prefer to do handle your sales tax manually, and that’s perfectly fine. If so, follow the steps in the box above.
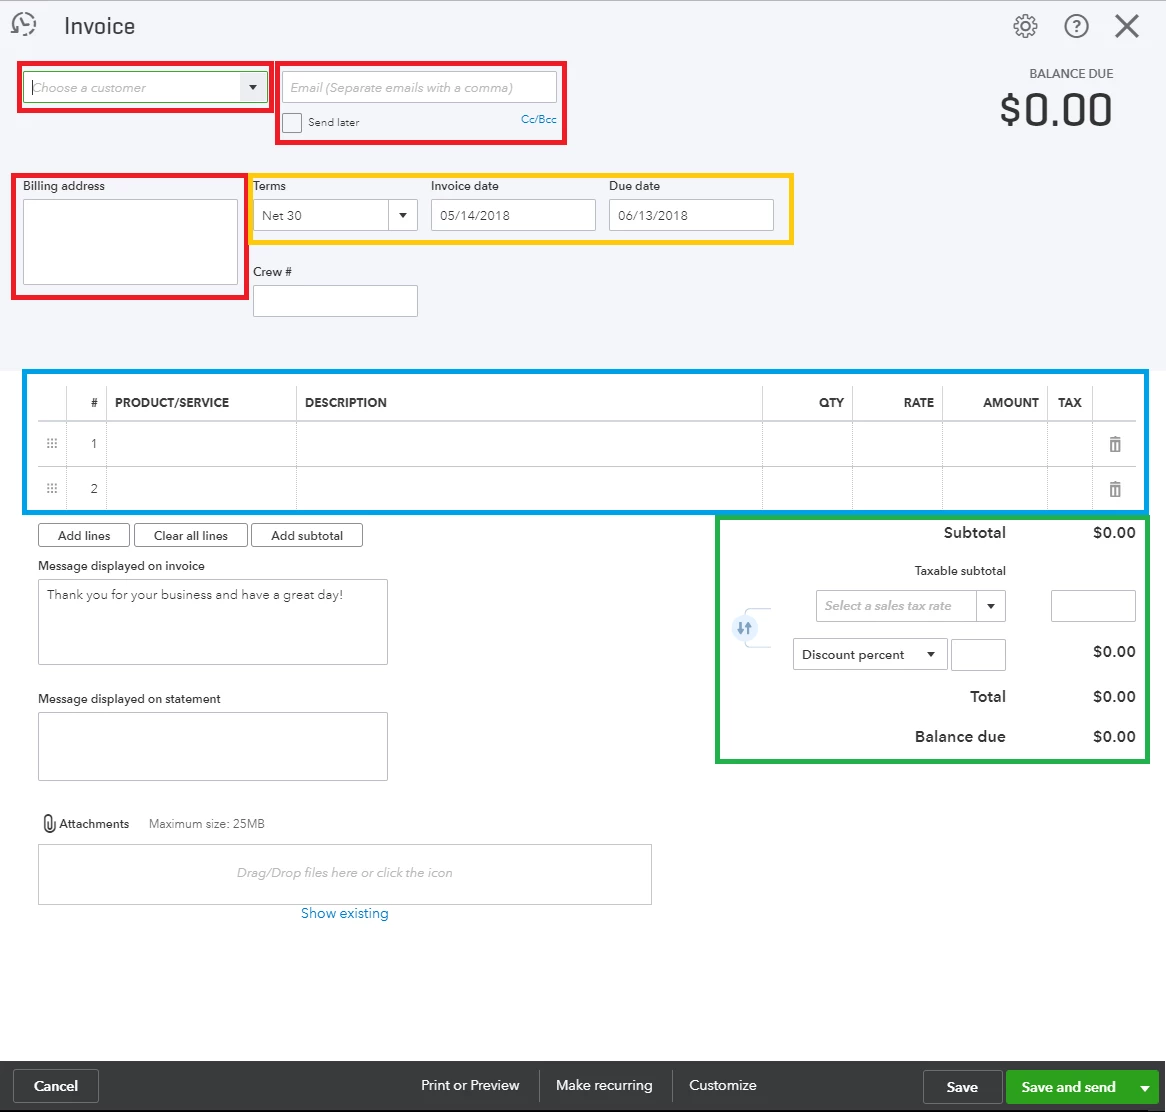
Minute 12: Create an Invoice in QuickBooks Test Drive
(Global Create Button [ ] > Invoice) ] > Invoice) |
Let's put in a bit of practice before the big show. We highly recommend using QuickBooks Test Drive to familiarize yourself with the available Invoicing features. In fact, we recommend utilizing Test Drive frequently during your first few weeks with QuickBooks Oline, using the provided practice data, rather than your actual data, to learn the ins-and-outs. Do note - Test Drive emulates QuickBooks Online Plus.
Once you're in Test Drive, click on the Global Create button . This button/menu is where you initiate the majority of transactions in QuickBooks (learn more in "Setting Up for Success with QuickBooks Online – The Fundamentals").
Familiarize yourself with each of the highlighted sections below and the types of data that go into each data field - we will build these databases over the next hour.
Why do we recommend Test Drive?
Having complete sample data gives you a comprehensive perspective of what your QuickBooks will look like in the next hour or so. This tool gives you the freedom to learn with confidence, knowing that changes made won't impacting your actual data.
When you try creating an invoice using the actual customers, accounts, and product information you use for your business, you’ll notice immediately what information is missing. This will tell you what to prioritize when you start entering products, services, and customers over the next hour.
Finished!
Take a moment to reflect …
Now that you have the essentials in place, consider this: what do you want to accomplish with your bookkeeping?
Certainly, you want to record all sales and expenses so you get an accurate picture of your businesses’ overall health. Enabling services like Online Banking and Payroll will also help streamline your accounting and keep you better organized.
But whether you choose to utilize some or all of the features in QuickBooks Online is up to you. You may only want to record daily sales transactions. You may want to only account for very large business assets and liabilities (though you should keep a record of what you omit somewhere). You may want to use Online Banking, but only automate certain accounts. It all depends on what information you want to track so you can make the smartest decisions for your business.
Set aside some time to write down your accounting goals. Once you commit to them, you’ll also know what areas of QuickBooks Online you’ll want to focus on most.

Now that you’ve set up the foundations for success, let's move on to building lists, entering transactions and automating features like online banking in "Your first hour with QuickBooks Online."
> Want a broader overview? Start with the “Setting up for Success with QuickBooks Online”
> Want to jump right in? Check out “How to Use Features and Functions in QuickBooks Online”