
Top 5- Banking

Hello Community! We’re back with another Top 5, but this time around, we’ll be focusing on some of the most asked questions on the topic of banking. If you’re wondering how to go about manually adding a bank account, merging bank accounts, or fixing a deleted reconciled transaction then this article is for you!
Let’s go over these together!
1. Can I manually add a bank account in QuickBooks Online?
Yes! You can manually add a bank account in QuickBooks Online easily. Let me show you how.
- From the left menu, click Accounting.
- Select Chart of Account.
- Click New, then fill out an Account Type, Detail Type, and Beginning Balance.
- Select Save and Close once finished.
That’s it!
For more resources, here's an article you can read to learn more about how you can manually add a bank account: Create subaccounts in your chart of accounts in QuickBooks Online.
2. Am I able to merge bank accounts?
You can totally merge bank accounts within your QuickBooks Online account!
It is super important to note, however, that account mergers are permanent and cannot be undone later.
Here are the steps for merging accounts:
- Choose Accounting on the left menu and click on Chart of Accounts.
- Look for the account you want to keep. Then, click the drop-down arrow next to View register and select Edit.
- Take note of the account details and click Cancel.
- Look for the account you want to merge. Then, click the drop-down arrow next to View register and select Edit.
- Change the account name and click Save.
- Choose Yes to confirm the merging process.
That's all there is to it!
Please be aware that when merging accounts in QuickBooks Online (QBO), all previous transactions will be transferred to the account you intend to keep. Make sure you've preserved any reconciliation reports that the account may have. Transactions are kept on the merged account and continue to be reconciled in this manner.
You can also reach out to your accountant for additional advice to ensure your records remain accurate.
Here’s information that can help organize your chart of accounts in QuickBooks. It provides tips to ensure everything is correct and easier for you to access financial data.
3. Can a Venmo account be linked?
Great question! Yes, you can link your Venmo account to QuickBooks Online.
Let me show you how:
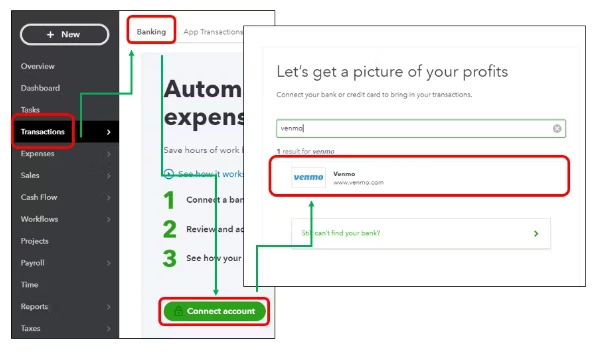
- Go to the Banking menu or Transactions menu.
- Select the Banking tab and click Connect Account on the landing page. Or select Add Account if you've already connected to a different banking account.
- Search for your bank, then click Continue.
- Enter the username and password you use for your bank's website in the window.
- Follow the onscreen steps to connect. Your bank may require additional security checks. It may take a few minutes to connect.
- Select the bank or credit card accounts you want to connect.
- Choose the matching account type from the drop-down list. These are accounts on your chart of accounts in QuickBooks.
- Choose how far back you want to download transactions and click Connect.
Once done, QuickBooks automatically downloads and categorizes bank and credit card transactions for you. All you have to do is approve the work!
Now you’re set!
4. My banking does not match my transactions. How can I go about fixing this?
I’m happy to help!
Some things to check first that could be preventing the program from matching the deposit to the payment are the following:
- Verify that the transaction has not been reconciled.
- Verify the transaction was entered using the same bank account.
- Make sure the Quickbooks Online transaction has not been previously matched to another bank-downloaded transaction.
- If it is a deposit or payment received, make sure it is not on the Bank Deposit page (undeposited).
If you're still unable to find the match, you have the option to Exclude the transactions instead of matching them. This will simply move the transactions out of the For Review tab, and won't impact your books since you've already recorded the payment.
Here's how:
- Go to Banking on the left navigation panel.
- Use the boxes on the left to select the deposits.
- Go to Batch Actions, and choose Exclude Selected.
That should do it!
5. I deleted a reconciled transaction. How can I correct it?
I’m glad you asked!
If you've deleted transactions that had the Reconciled status, you will need to re-create them. To find the information from the transactions you deleted, you can check out the Audit Log. It's super easy and only takes a few clicks.
Take a look:
- Go to Gear ⚙, then Audit Log.
- Click the Filter drop-down, pick the dates when the transactions were deleted, and then choose the Show Only These Events radio button.
- Tick the Transactions checkbox, then select Deleted/Voided Transactions from the Show drop-down.
- Hit Apply.
- The Audit log will now be filtered to only show deleted transactions based on the filters you applied. Find the transactions that were deleted in the list and click View.
- You can use the information displayed here to re-create the transaction. Be sure to change the transaction status in the register back to R for Reconciled.
If you aren't sure how to change the transaction's status back to Reconciled from within the register, it's super easy. Check it out:
- From the account register, locate the transaction you just recreated.
- Change the reconciliation status to "R" by clicking on the blank box in the column marked with a check mark. Once your transaction has an R next to it, it's reconciled.
That's it!
That’s all for today. I hope you found these Top 5 Q & A’s helpful and got some valuable resources out of them. Like always, if you have any other questions or concerns, please feel free to ask us here in the Community. Until next time!