January 8, 2021
Solved

Change an item type in desktop

  • January 8, 2021
  • 1 reply
  • 0 views

I want to change an item type in my inventory these instructions that keep coming up do not work. When I double click an item and it opens the type button is opaque and you cannot select it.


ex: I have an item marked as inventory part but it needs to be a shop supply (non-inventory)


Change item type

You can change an item's type if the item is a Non-inventory part, an Other Charge item, or an inventory part.

  1. From the Lists menu, select Item List (for Windows) or Items (for Mac).
  2. Double-click the item you want to change.
  3. From the Type drop-down, select the new item type.
  4. Choose OK.
 
  • If you are changing the item to an inventory part or an inventory assembly item, the "as of" date that you enter for the total value of the item must be a date that is after the date of the last transaction that uses the item.
  • Because the types of items that can be changed and what they can be changed to are limited, you cannot always change an item back. For example, if you change an Other Charge item to an inventory part item, you can no longer change its type.
Best answer by JasroV

I appreciate you for going through the steps provided in one of our articles, @GCC13.


I’m here to share with you some insights about changing item types in your QuickBooks Desktop (QBDT) software.


Changing an Inventory type item to a Non-inventory item isn’t possible. You only have the option to change it to an Inventory Assembly type item. I’ve attached an image below for your visual reference. 
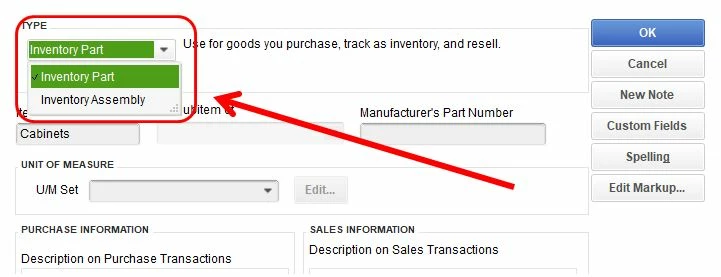
 

As a way around, you’ll want to copy the detail of the item and create a new one. Once done, you can either make the item inactive or delete it. For more details about this, you can refer to this article in managing your items: Add, edit, and delete items.


You might also want to check these links for additional reference in tracking your inventories effectively:

I’ll be around in case you have any follow-up questions about inventories in QuickBooks. I’m always around to help you. Keep safe and take care!


1 reply

JasroV
JasroVAnswer
January 8, 2021

I appreciate you for going through the steps provided in one of our articles, @GCC13.


I’m here to share with you some insights about changing item types in your QuickBooks Desktop (QBDT) software.


Changing an Inventory type item to a Non-inventory item isn’t possible. You only have the option to change it to an Inventory Assembly type item. I’ve attached an image below for your visual reference. 


As a way around, you’ll want to copy the detail of the item and create a new one. Once done, you can either make the item inactive or delete it. For more details about this, you can refer to this article in managing your items: Add, edit, and delete items.


You might also want to check these links for additional reference in tracking your inventories effectively:

I’ll be around in case you have any follow-up questions about inventories in QuickBooks. I’m always around to help you. Keep safe and take care!

January 4, 2022

Why is is not possible to change a service item to a non-inventory part item? The person who set up my original QB  made every item Service. I do landscaping, and obviously dirt and mulch are not services.


Do I have to set up a new company? And if so, is there way to transfer over the customer base, part of item list that is correct, and chart of accounts?


Thank you.

January 4, 2022

Let me share some share some details about changing your inventory item to a non-inventory one, Darsaya. 


The option to change the inventory type to non-inventory is unavailable in QuickBooks Desktop. We can only change it between Inventory Part or Inventory Assembly. Alternatively, we can create a new non-inventory item and delete the inventory one. See the screenshot below on how it looks like if you're going to change the inventory type:


Follow the steps below to create a non-inventory item:

  1. Go to the Inventory menu, select Inventory Center.
  2. Click the New Inventory Item icon and choose New Inventory Item.
  3. Select the Type drop-down and select Non-Inventory Part.
  4. Enter the details needed, such as the item name, price, and not limited to the account.
  5. Select OK to save the item. I've added some screenshots for additional reference:


Once done, you can check out the non-inventory items you've added in the Lists menu. Then go to the Item List section. Here's an article you can refer for more details adding, editing, and deleting items in QuickBooks Desktop for Windows and Mac.


Feel free to visit our Inventory Reports page for more insights about creating and managing inventory reports.


If you need to take care of other things in QuickBooks, I'm with you every step of the way. Just leave a comment below and I'll get back to you. Have a great day.