December 31, 2019
Solved

How to record donation to charity that is also a customer?

  • December 31, 2019
  • 1 reply
  • 0 views

We have a client that is a not-for-profit charity. We need to record a charitable contribution we made to them by credit card.  When entering their name they come up as a "customer" and not sure if we should record the contribution to them this way or if we should modify their name and add as a new entry and if so add as "vendor" or "other name".


Any ideas?

Best answer by Jen_D

Hi, we are doing this for a CC not a check but we tried both ways and notice that QB MAC Desktop does NOT prompt us to enter a new name it actually fills in payable line with the existing customer name. I take it we should NOT accept that and create a new name since it's a vendor, right? That's really our whole question, maybe we didn't explain it correctly.


Glad to have you back, @mac2it,


When making donations or charitable contributions, you may set up the Non-profit organization you're donating to as a vendor, just as you would do for any other company expenses.


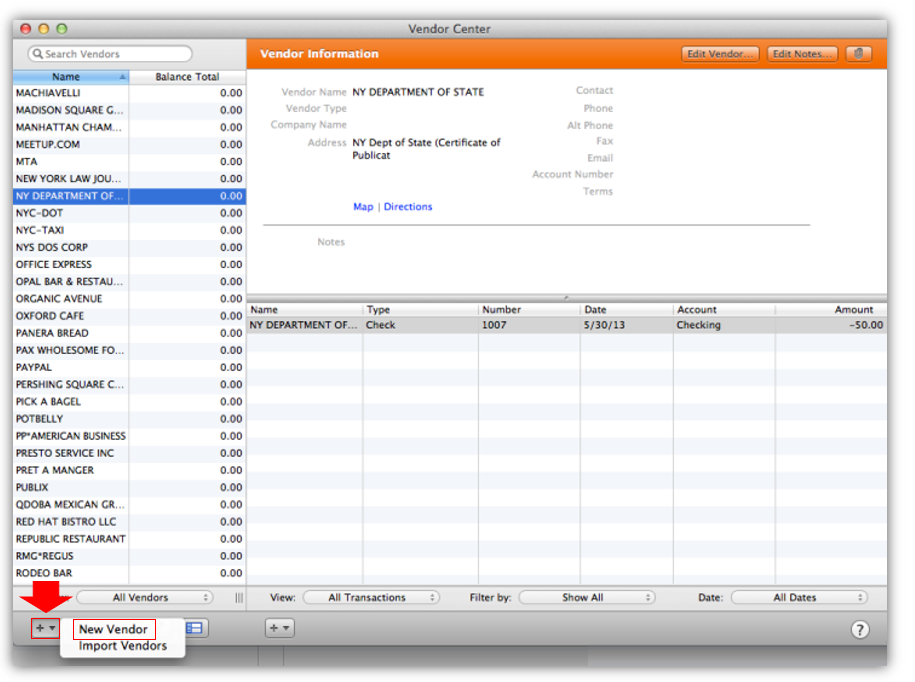
To add a Vendor in QuickBooks Mac:


  1. Select the Vendor menu from the top toolbar, and select Vendor Center.
  2. Click the Plus (+) menu at the bottom of the vendor list.
  3. Pick Add Vendor from the options.


QuickBooks doesn't allow multiple names in the system. Since the organization is already listed as a customer, add a slightly different or modified name in the Vendor Center.


Once added, record the credit card contribution as Bill or Check then use Credit Card for the Payment Method. You may also utilize the Enter Credit Card Charges under the Banking tab.


Let me know if you have other questions or need clarification about this topic, mention me or add a new comment below. I'm more than glad to share additional insights about QuickBooks and help any time. Have a wonderful day!


1 reply

December 31, 2019

Hi @mac2it,


You can re-enter your customer as a vendor, with a slightly modified name since QuickBooks will notify you that these entries have the same name. 


As for the process of recording the donation, you can follow these steps: 


  1. Go to the Banking menu.
  2. Select Enter Credit Card Charges.
  3. Choose the vendor's name you created earlier under the Purchased from drop-down menu.
  4. Enter the amount, and you can enter a memo as well.
  5. Under the Expenses tab, you can either use existing expense accounts, or create a new one to track your donations. 
  6. Tap Save & Close when done.

For the expense account dedicated to tracking your donations, I'd suggest you ask your accountant on how it's best to record it in your books. 


In case you're using QuickBooks Nonprofit, view this article: Process a credit card donation in QuickBooks Desktop.


Let me know if you have other questions, I'll be sure to get back to you.

mac2itAuthor
January 1, 2020

Thank for the reply. It doesn't seem this will work as a sales receipt records income and on QB Mac Desktop the sales receipt just records money received from a customer. To be clear we are a business not a charity. We have a customer that is a charity and we made a donation to them and are trying to figure out if we need to just add a new name for the client who is also now a vendor.


Do we just go to Banking>Enter Credit Card Charges, then enter their name in the "Purchased From" section and add them as a vendor?


Is there a recommended practice so that it's not confusing if you see the same name as both customer and vendor?

IntuitLily
January 2, 2020

Thanks for getting back, @mac2it.


For this scenario, you can write a check to the customer/vendor to show that you donated.


To write a check:


  1. Choose Banking and click Write Checks.
  2. Click the New Check on the left panel or click the + at the bottom of the list,
  3. Enter the information for the check and click Save.

The customer name should be slightly different from the vendor name. QuickBooks will automatically prompt if the name is already in use regardless of the type.


Here's what I can recommend:


  1. Go to the Vendor menu then select the Vendor Center.
  2. Click the + menu at the bottom of the vendor list and click Add Vendor.
  3. Enter the name of the vendor, as you’d like it to appear on your Vendor list (you can add special characters to your customer's name).
  4. Review all the information and click Save.

Please reach out to me if you have further questions. I'm more than happy to help. Take care!