January 12, 2021
Solved

Nesting of Classes Issue

  • January 12, 2021
  • 1 reply
  • 0 views

I am trying to nest an existing class and I keep getting the error "Nesting is limited to 5 levels deep" even though it would all be 4 levels. I have other classes nested in the same way with no issue.


Best answer by ReyJohn_D

I'm just the right person to take care of your nesting of classes issue, @sjstock.


QuickBooks Online only allows nesting of classes up to five (5) levels deep. You'll get the said error message when you go beyond that limit. In your case, I can see that the nested classes are still four (4) levels deep. I know some solutions you can take to resolve the issue you're getting.


First, QuickBooks save cache to remember frequently visited sites. This way, you can save time and load pages faster. However, too much of them can cause unusual QuickBooks responses. 


To fix this, let's try to refresh your browser first. To do that, click the Reload icon beside the QuickBooks URL or press CTRL F5 on your keyboard. 


If it doesn't work, let's use a private browser (incognito) when running QuickBooks. Private mode disables cache and cookies. Thus, a perfect place to isolate issues like this.


Here are the useful shortcut keys you can use to access one:


  • Ctrl+ Shift + N for Google Chrome .
  • Ctrl + Shift + P for Mozilla Firefox  and Microsoft Edge .
  • Command + Shift + N for Safari .

If it works fine this time, you can go back to your original browser and clear its cache. Doing so helps delete unwanted piled up files and let the system revert to its default state. Also, you can use another supported web engine as an alternative.


Otherwise, you may need to delete and recreate the nested or sub-classes.


To delete or inactivate the nested classes:
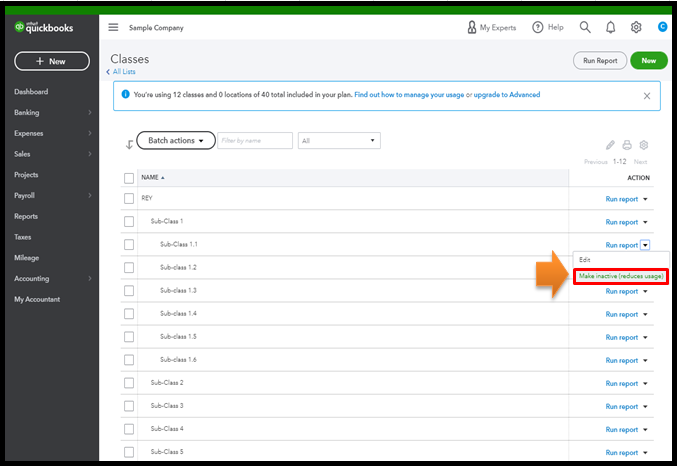
 

  1. Click the Gear icon, and then choose All lists under Lists.
  2. Select Classes.
  3. Look for the nested or sub-class.
  4. Select Make inactive in the Run report drop-down under the Action column.
  5. Click Yes to continue.
  6. Once done, recreate the nested classes as you normally do.

You can also run reports by class to check your sales, expenses, or profitability by business segment. For more tips, please head to this link: How to run reports by class.


I'm just around the corner to help if you have more questions about handling classes in QuickBooks. Just comment back below and I'll get back to you as quickly as I can.

1 reply

ReyJohn_DAnswer
January 12, 2021

I'm just the right person to take care of your nesting of classes issue, @sjstock.


QuickBooks Online only allows nesting of classes up to five (5) levels deep. You'll get the said error message when you go beyond that limit. In your case, I can see that the nested classes are still four (4) levels deep. I know some solutions you can take to resolve the issue you're getting.


First, QuickBooks save cache to remember frequently visited sites. This way, you can save time and load pages faster. However, too much of them can cause unusual QuickBooks responses. 


To fix this, let's try to refresh your browser first. To do that, click the Reload icon beside the QuickBooks URL or press CTRL F5 on your keyboard. 


If it doesn't work, let's use a private browser (incognito) when running QuickBooks. Private mode disables cache and cookies. Thus, a perfect place to isolate issues like this.


Here are the useful shortcut keys you can use to access one:


  • Ctrl+ Shift + N for Google Chrome .
  • Ctrl + Shift + P for Mozilla Firefox  and Microsoft Edge .
  • Command + Shift + N for Safari .

If it works fine this time, you can go back to your original browser and clear its cache. Doing so helps delete unwanted piled up files and let the system revert to its default state. Also, you can use another supported web engine as an alternative.


Otherwise, you may need to delete and recreate the nested or sub-classes.


To delete or inactivate the nested classes:


  1. Click the Gear icon, and then choose All lists under Lists.
  2. Select Classes.
  3. Look for the nested or sub-class.
  4. Select Make inactive in the Run report drop-down under the Action column.
  5. Click Yes to continue.
  6. Once done, recreate the nested classes as you normally do.

You can also run reports by class to check your sales, expenses, or profitability by business segment. For more tips, please head to this link: How to run reports by class.


I'm just around the corner to help if you have more questions about handling classes in QuickBooks. Just comment back below and I'll get back to you as quickly as I can.