May 20, 2020
Question

Generate Vendor Report

  • May 20, 2020
  • 1 reply
  • 0 views


Using QB Desktop Enterprise

I need a report that I can print/export to Excel that will give me certain information on payments made to vendors.  The report will be needed for multiple vendors that can be run for the cheque date


The report needs to show the following

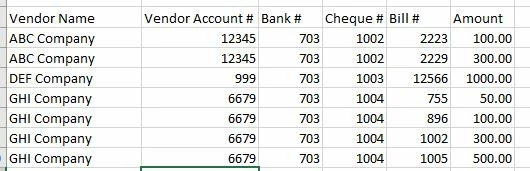
The vendors name/The vendors account number/The bank account it was paid from

The cheque number/The invoice number/The amount of the invoice that was paid


I do not want it to show the details of the invoice that was paid only the total amount

Using the example below

I do not need to know that ACB total is 400.00 only that it was two invoices and their total amount

(I also do not need the detail breakout of the invoices if there is any)


Any help would be apricated

Thanks


1 reply

May 21, 2020

Hey ttruelove.


Getting a report to show everything you need at a glance can help keep your business running smoothly. I can help you with getting your reports customized to facilitate this.


Good news is QuickBooks is all about allowing you to customize the information you see in your reports. Due to your specific needs that you have to display, we can customize a few vendor reports to include the information. You can then export to excel and merge the data in the spreadsheet.


I suggest the Vendor Balance Detail to get the Vendor bill data you want.  You can find the Vendor Balance Detail Report here: Reports>Vendors & Payables>Vendor Balance Detail. I also suggest the Cheque Detail report to get your bank account and cheque numbers which can be found here: Reports>Banking>Cheque Detail.


You can customize the report to include the information you want to be shown by following the steps in this link: https://community.intuit.com/articles/1764377


Once you get what you need, you'll want to export to Excel with these steps.
1. In QuickBooks, go to the Reports menu and select Reports Centre.
2. Find and open any report.
3. Select the Excel on the toolbar. 
4. To create a new Excel workbook, select Create New Worksheet
5. If you want to format the data a specific way, select Advanced. This is optional.Note: The report must have less than 256 columns.
If you see a message that says your report has too many columns, select Advanced. Select and uncheck the Space between columns checkbox, then select OK.
6. When you’re ready to export, select OK. To open the report in Excel, you can also select Export.


If these steps don't get the report you want, I suggest looking into a third party app to get the information you need here: https://desktop.apps.com/home


Have a great day!