Quick Books Self employed doesn't have an apps tab that I can see? I think I need to know why the csv file isn't uploading and how to correct that?
The Community has you covered, @Rae Creates. I'll help you get that CSV uploaded right away.
The one that I've posted recently is for QuickBooks Online. To import bank transactions using CSV in QBSE, you'll have to make sure you've chosen the correct columns in the mapping stage. Otherwise, QuickBooks will not be able to read the data. To make the mapping stage easier, you can do the following:
- Delete columns you do not need from your CSV to avoid any confusion. The columns that are required by QuickBooks are:
- Date - Correct and standardise the date format to a single format (for example, dd/mm/yyyy).
- Description
- Amount
- Change the names of the columns in your CSV to match the titles in QuickBooks.
Based on your screenshot, get the rows A, C, and F only. With regards to the Fees & Taxes, you can add them manually by splitting the sale transaction during the categorisation process. Before deleting any rows and columns, please ensure to secure a backup copy.
Then, here's how to import them:
- Go to the Gear icon.
- Select Imports.
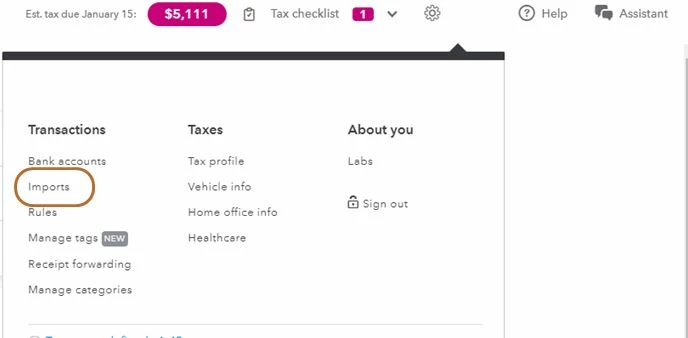
- Select Import older transactions for the account you want to add transactions to.
- Select Browse and find the file you downloaded from your bank. It's usually in your Downloads folder.
- Select the file and select Open to start the import.
- Review the column headers and data. Make sure the Date, Description, and Amount columns on the CSV match the columns and order in QuickBooks. The other column headers can be in any order.
- Select Continue to complete the import.
- Follow the on-screen instruction.
You can read through our guide on importing bank transactions using Excel CSV files for more information.
Once done, it's time to categorise and split the transactions. Doing this will allow you to split the sale transaction and add the category for your fees and taxes.
- Go to the Transactions menu.
- Find the transaction you want to split.
- Select Split from the Type column. This opens the Split Transaction window.
- Select Percentage or Amount from the Split by ▼ dropdown.
- For each split, select Business or Personal from the Type ▼ dropdown.
- If you select Business, select the link in the Category column and select the category you want the split to go into.
- Enter the amount or percentage for each split.
- To add additional splits, select Add line.
- If you need to exclude a split, select the Exclude checkbox.
- When you're done, select Save.
Here are some helpful resources that will ensure your success:
Please feel free to reach out to us here with all of your questions and concerns. I'm determined to ensure your success.

