
Set up and edit VAT settings, codes and rates
This article is for all UK VAT-registered businesses using QuickBooks Online to calculate and submit VAT to HMRC.
- Set up VAT
- Edit settings, codes, schemes and dates
- Add an additional tax rate, group rate or custom tax
- Show/hide active or inactive codes
- How to turn off VAT, MTD and banking feeds
- Calculate VAT at line or invoice level
3. Add a tax or group rate or custom tax
To set up an additional tax rate, group rate or custom tax to your company, follow these steps.
Note: Once you create a tax agency, you cannot delete it.
- Go to VAT.
- Select Add Tax.
- Select the type of tax you want to add.
- Tax rate: add another tax rate for VAT, such as a local tax that is not already included.
- Group rate: combine multiple taxes and make applying them to your transactions easier. All taxes you include are calculated and charged at once, but we track them separately for you.
- Custom tax: add a tax agency and a tax percentage, such as an environmental levy, hotel, or petrol tax.
- Select Save.
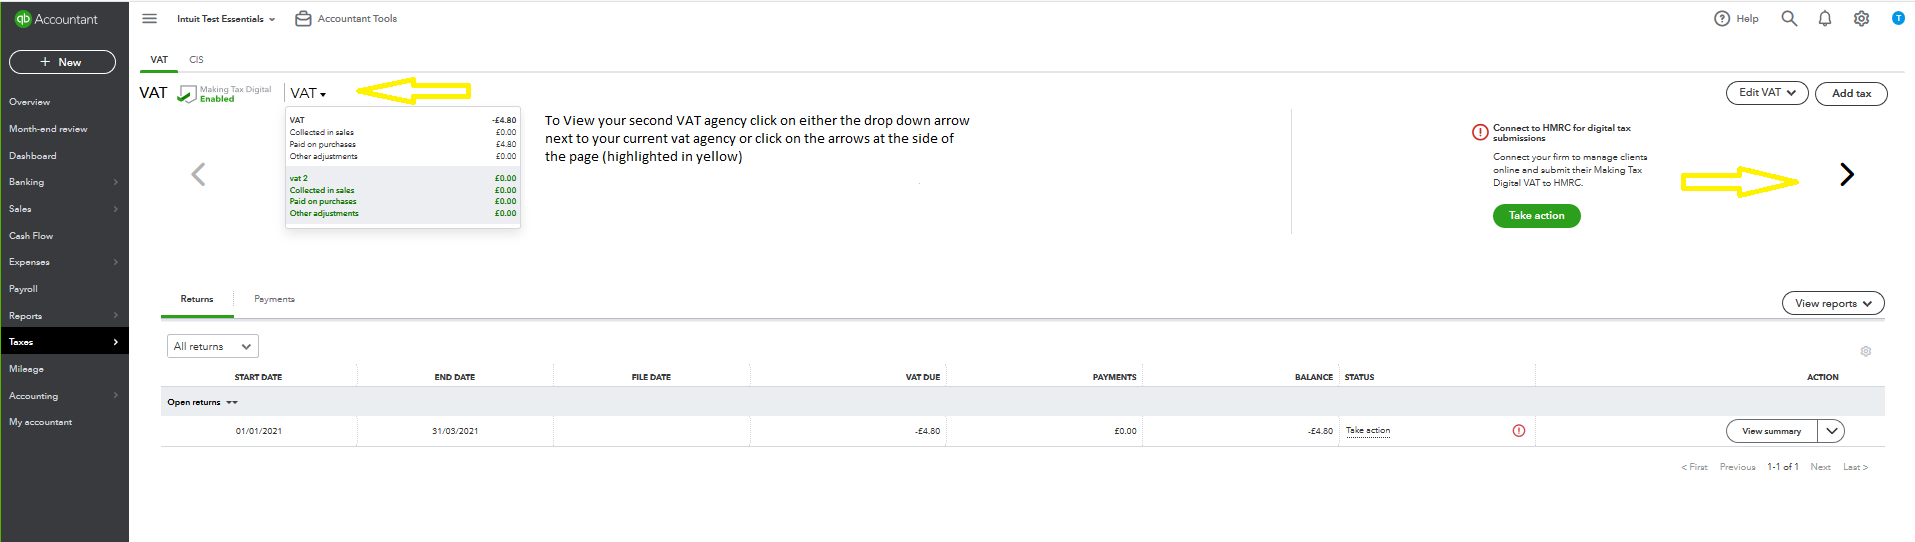
To view your new VAT agency, select the dropdown arrow next to the current VAT agency or click the arrow on the right side of the Taxes dashboard.
4. Show/hide tax codes
If you can't see a particular code in QuickBooks, it may be turned off. To turn on codes in QuickBooks follow these steps:
- Go to VAT and select VAT.
- Select Edit VAT and then Edit Rates.
- Select the gear icon above VAT rates and select Include inactive. This will show a list of all the codes that are currently turned off.
- Use the toggle feature against the VAT code you want to turn on/off.
5. Turn off VAT
If you’ve deregistered from VAT you will want to turn off VAT in your settings too. This will stop VAT from showing in future transactions and bank feeds, and will save you time from having to update these manually in QuickBooks.
While you won’t be able to turn off VAT completely, there is a quick and simple way to default your transactions to show ‘No VAT’ and here’s how:
- Select the Gear icon and select Account and settings.
- In the Advanced, select the pencil Edit icon in Accounting.
- Change the Default tax selection to No VAT.
- Select Save and then Done.
Now when you go to create a transaction in QuickBooks, the VAT column will be hidden under the Default tax rate selection options.
To turn off VAT in banking feeds
If you have bank accounts connected to QuickBooks, you will need to create a new rule to ensure transactions are set to No VAT in your banking feed
- Go to Bookkeeping and select Rules (Take me there).
- Select New rule.
- Name the new rule with something memorable such as ‘VAT deregistration money in’.
- Select Money in.
- Change Description to Amount.
- In the next field, select Is greater than.
- Enter 0.01 in the value field.
- Select No VAT for the tax rate.
- Repeat the steps for Money out.
To turn off Making Tax Digital (MTD)
- Select the Gear icon and select Account and settings.
- In Advanced, go to Making Tax Digital.
- Select Learn how to Disconnect and follow the steps.
More helpful links
Here's a list of the common VAT codes in QuickBooks Online.
Learn how to submit a VAT return to HMRC.