


LisaNullar
April 19, 2018
Solved

Importing Custom Invoice Templates into QuickBooks Online

  • April 19, 2018
  • 19 replies
  • 0 views

Now you can spice up your brand with your own custom invoice template. In just a few steps, you will be able to import styles that bring enhanced flexibility to your invoices and let your brand shine!


Step 1 – Make sure you have enabled Import Styles in QuickBooks Labs

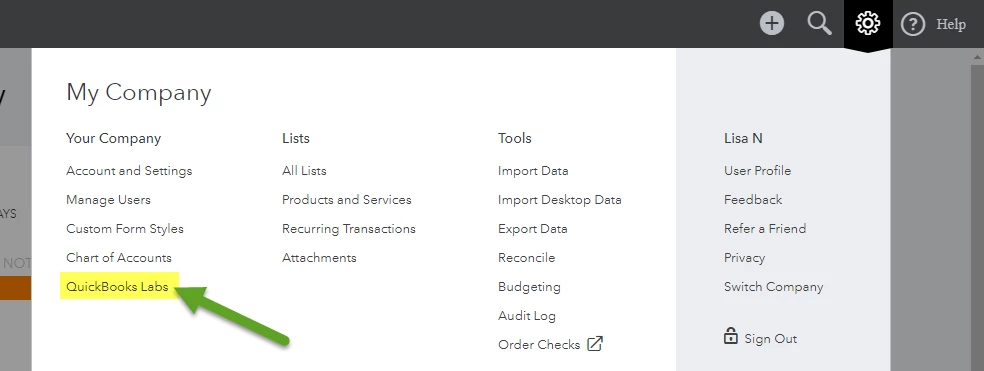
       1.  Click on the Gear icon in the upper right corner and select QuickBooks Labs 


       2. Scroll down the screen and toggle the switch for Import Styles to On.
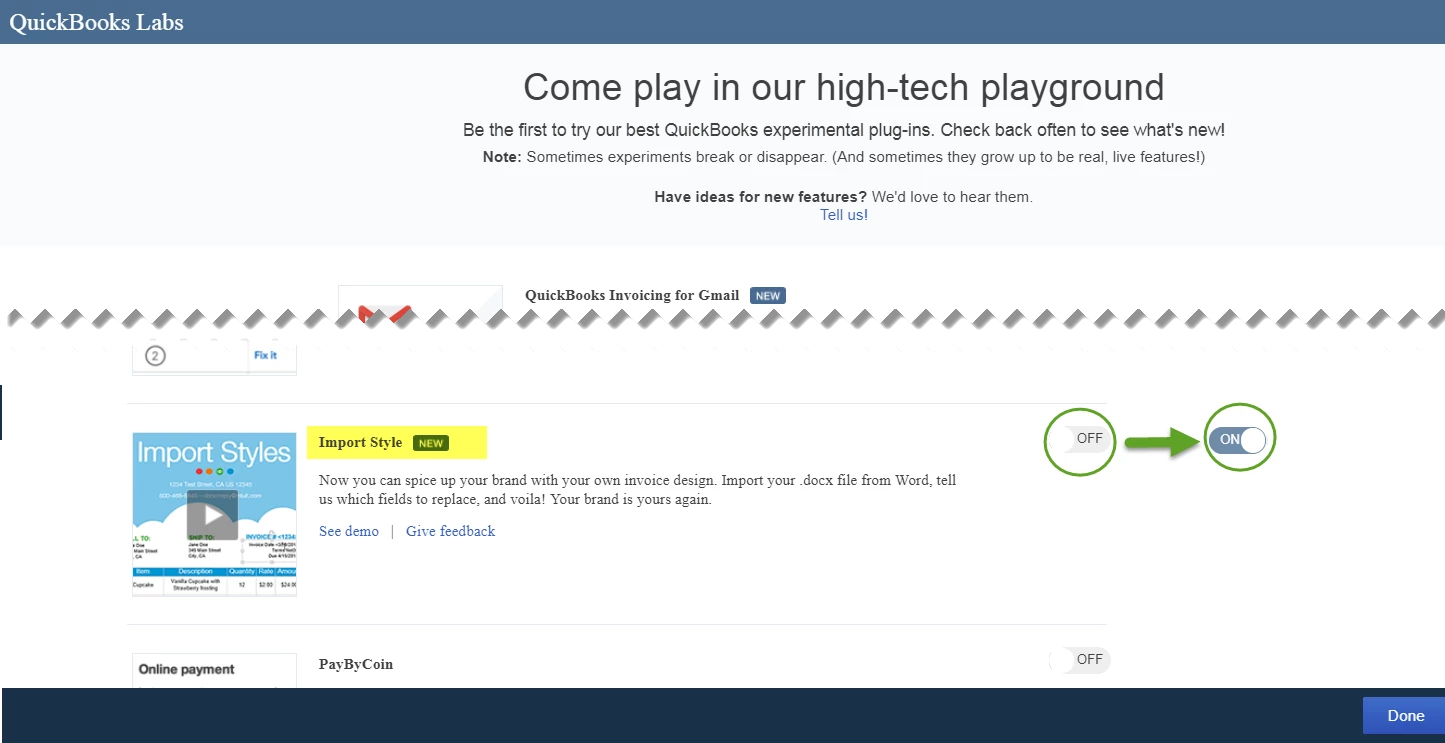


       3. Click the blue Done button.


Step 2 – Create your template in Word


Following these tips will make sure that your forms look their best when you import them into QuickBooks Online: 


  • Indicate which fields that you want QuickBooks to map data to by marking it with opening and closing angle brackets “<“and “>”  Refer to the EZ Map Field list below to find out which QuickBooks fields you can use in your imported templates.
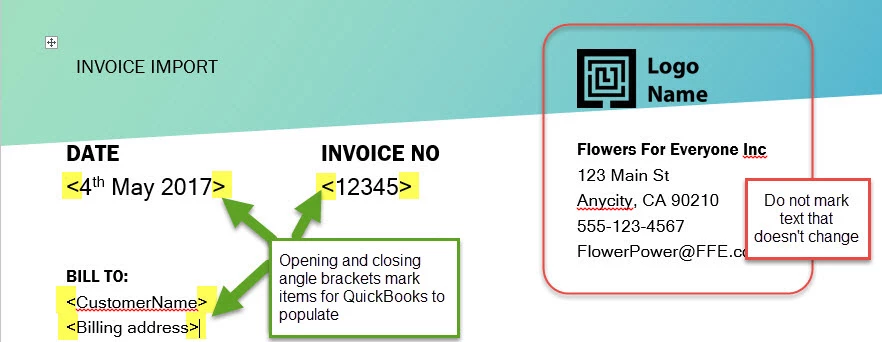
 

  • Don’t mark data that doesn’t change - information like your company name, address, and contact information stays the same, so there’s no need to mark them on your forms.
  • For us to upload your style successfully, you will need to use one of our supported fonts:
    o Arial Unicode MS
    o Courier, Courier Bold, Courier Oblique, Courier Bold-Oblique
    o Helvetica, Helvetica Bold, Helvetica Oblique, Helvetica Bold-Oblique
    o Times Roman, Times Bold, Times Italic, Times Bold-Italic
    o Symbol
    o Zapf Dingbats
  • Technical note: fields that are independent from each other and don’t repeat are known as Scalar Fields. Examples of Scalar Fields include invoice numbers, invoice due dates, and total invoice amount. In contrast, Table Fields are fields that go together as part of a larger objects and repeat, such as fields in the Activity Table or Account Summary on invoice.


  • In order to make Import Styles work for you, follow these best practices:
    Scalar Fields can be placed inside text boxes or tables. However, Scalar and Table fields should NOT be part of the same table.
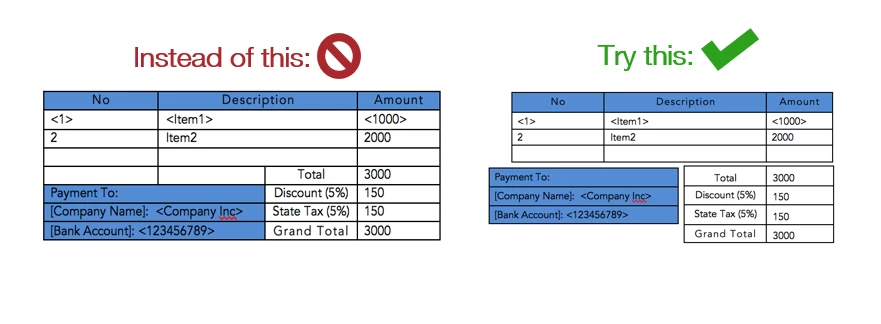
  • Table Fields must always be placed inside tables
  • Table Fields in the first non-header row of a table are repeated until all rows in your invoice are rendered. All other rows are ignored
  • Formatting of the first non-header row repeats on all rows. Don’t be surprised by this
  • Avoid the following elements as they will not transfer correctly/cause issues with your import:

          o Audio

          o ClipArt, Word Art
          o Animated GIFS
          o Embedded files
          o Adding or updating hidden links or merging fields
          o Files over 2MB
          o Non .docx file types or older MS Word documents renamed as .docx files 


Step 3 – Import your template into QuickBooks Online


To import your customer template, follow these steps: 


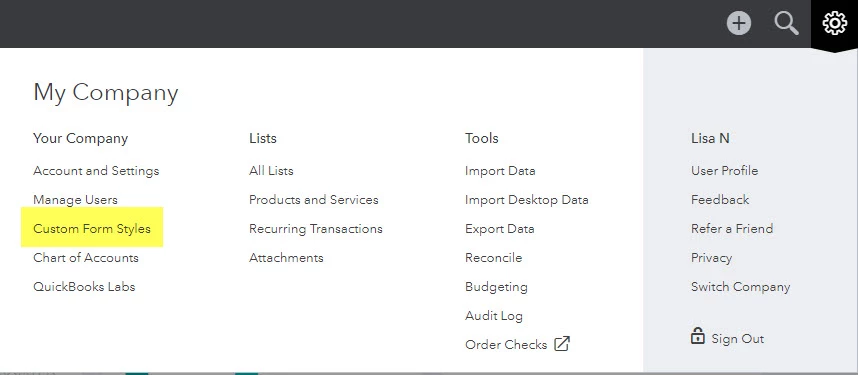
       1. Click on the Gear icon in the upper right corner and select Custom Form Styles
         

       2. Click the arrow next to New style and select Import style.

  

       3. Select a form type and click the upload field to select your template file. If you already have a design in docx (MS Word 2010+) format, you may directly proceed to the next step. If you want to start from scratch, we suggest that you download a sample template and modify it according to your needs.

       4. Click Next to upload your document. 


The uploaded document is analyzed and scanned for marked fields prior to mapping. 


 Received an error during uploading?  Don’t worry, here’s how to fix it:

Error code

What does it mean?

How can I fix it?

size_validation_error

Your file is too large to upload

Your document must be less than 2MB

extension_format_error

The file you selected isn’t of a type we support

Try uploading a Microsoft Office 2010 (*.docx) file


 Step 4 – Map marked areas in your document to QuickBooks data fields


Once the upload is complete, QuickBooks will make an initial pass at mapping fields using an algorithm that tries to predict the most applicable data with the marked areas on your template.


It’s important to review each field to make sure that the mapped fields from your template correspond to the correct fields in QuickBooks Online.


Each marked section on your document will have a number next to it, this corresponds with the number on your invoice preview. As an example, note the numbering and mapping of fields highlighted below:
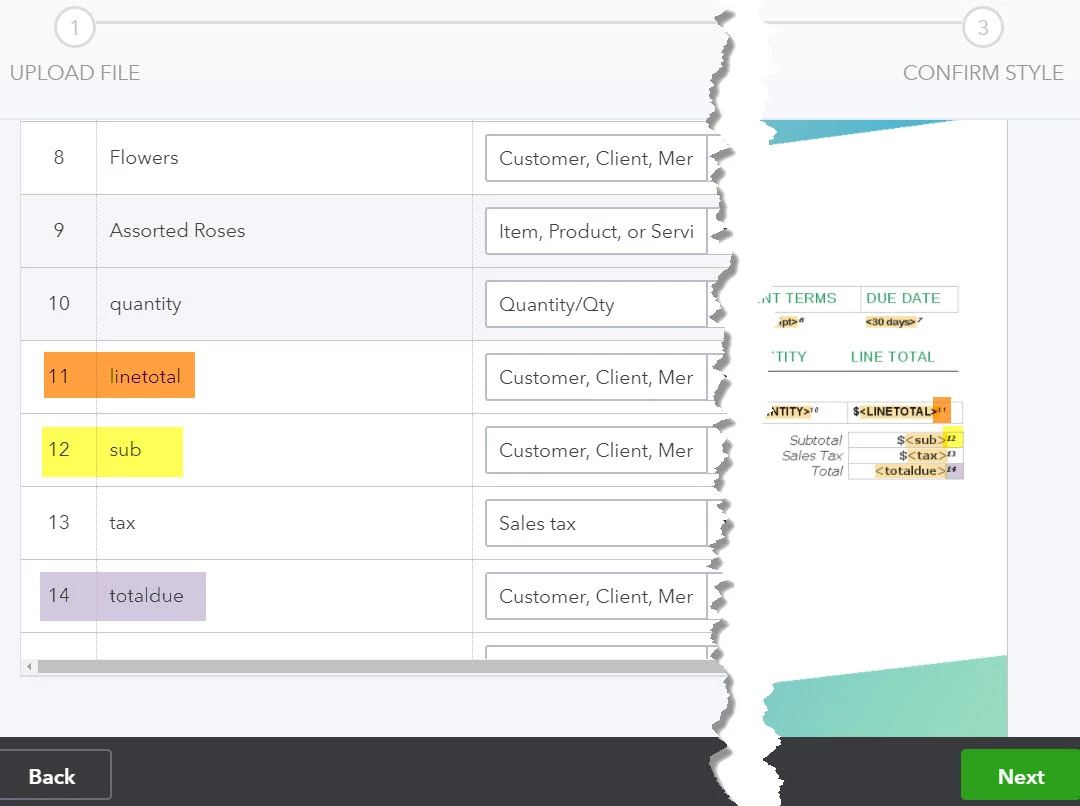


As you can see in the image, some of the fields are not correctly mapped.  To change the mapping you can either:

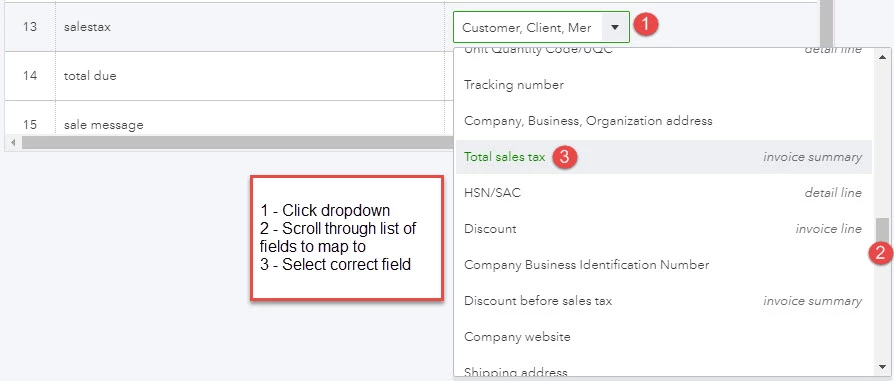
  • Click on the drop down for the line you want to change and scroll through until you find the mapping you want
 

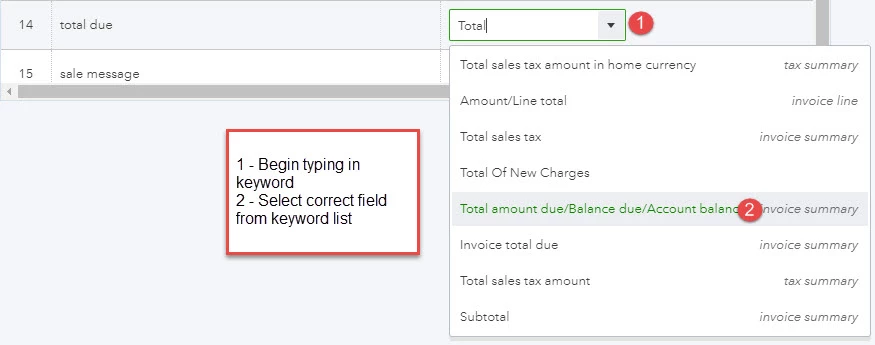
  •  Type the word that you know corresponds to the mapping in the drop down and select from the list – for example, type in “Total” and it will only show fields that contain the word in them.
 

 Once everything is linked correctly and looks good, go ahead and click the Next button at the bottom of the screen and you will be able to see a preview of your invoice. 


If you are happy with the way everything looks, simply click Save and type in a name for your new style. Your new style is now ready to use!


Errors during mapping? 

Error code

What does it mean?

How can I fix it?

Fetching preview failed

An attempt to create a preview of your style failed

Check for angle brackets applied in the wrong place or applied incorrectly. Try to reduce fields marked with angle brackets until Preview succeeds and then add them back in one at a time to isolate the mapping error.

Save Mapping failed

The selected mappings could not be saved

Please try again or contact support

No Mapping found

The mapping wizard could not find any field that required mapping

Please mark at least one data element on your template with chevrons in order for mapping to work

Multiple Page Document

The document uploaded has multiple pages

Please restrict the Style to a single page document


Step 5 – Use your custom style invoice

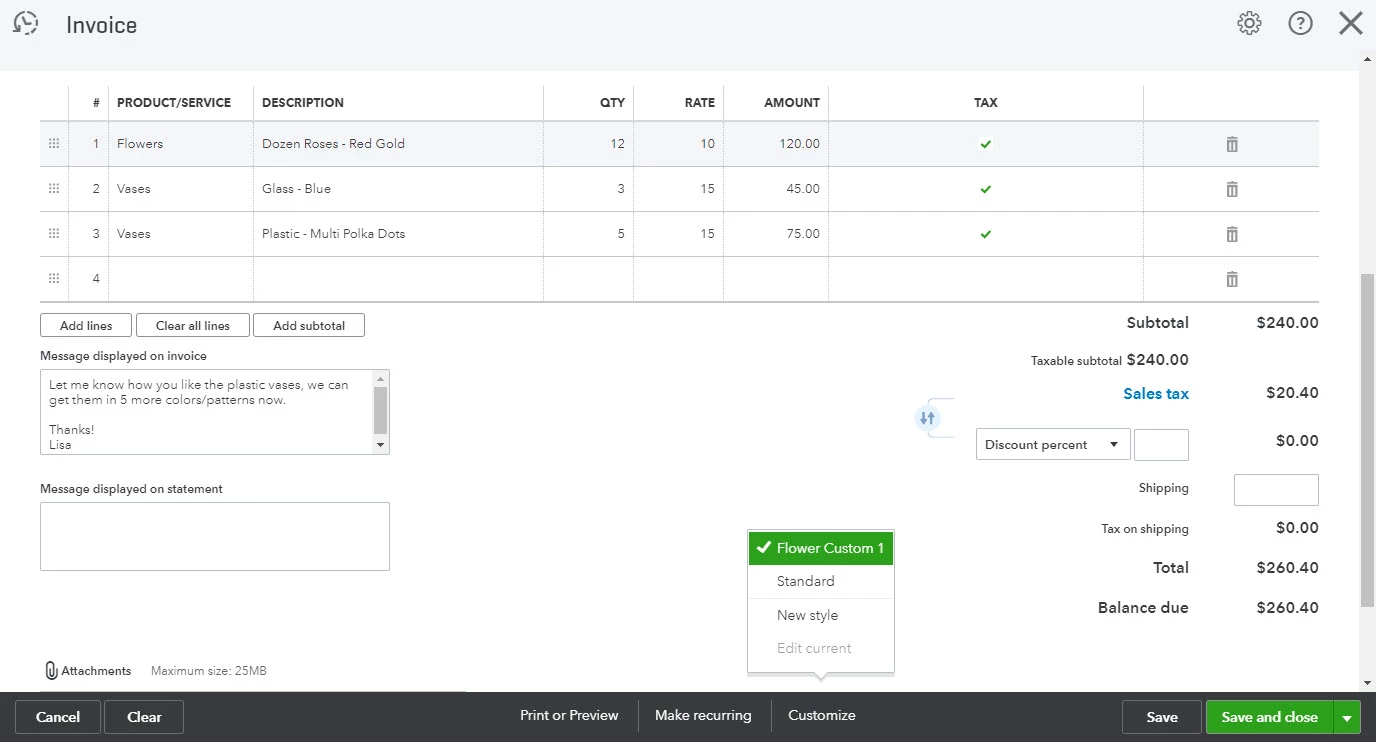
Using your new custom template is as easy as creating the invoice as normal, then clicking on Customize at the bottom of your screen and choosing the saved custom template. 
 

 FAQs


If you have any questions, we’re here to help! We’ve put together answers to some common questions to get you back to business quickly.


"We can't display a preview.  Please correct your mappings in the previous steps and try again" 

Certain fields are expected to be inside tables. For example line item information like Quantity, Product, and Price are tabular and should be inside tables. Please make sure while mapping that these fields are mapped to fields inside tables in style being imported.


Some data is not appearing in the printed or preview document.  Why?

We use settings in your Standard form style to decide how data is handled and presented in your imported templates. Please enable the desired settings in your standard style by following the steps below:


  1. Click the Gear Icon then select Custom Form Styles.
  2. Locate your Standard template, then click Edit.
  3. Enable your desired settings, and click Save.


Your data should now appear in your imported style.


It’s also important to note that if you do not add mappings to your style for your invoice field, that data will not be displayed on your forms later. For example, if you do not map a field for “Shipping Charge Value”, shipping costs will not appear on your form regardless of if you have entered them on your invoice


Are there any restrictions on what I can upload?

Only word (.docx) documents under 2MB can be uploaded to QuickBooks.


Can I upload a style with multiple pages?

Yes


Can I download my imported form style?

Currently, you cannot download the style that was imported. We recommend that you save a local copy of the template you imported, and take a quick note of the mappings you selected.


Do I have to have a field mapped to import a style?

Yes. The style you want to import should have at least one field that has to be mapped to data.


I see a blank screen after mapping
This situation can occur if the final output cannot be formed. This can happen due to any of the following reasons
* incorrect mapping
* Incorrect use of Table (ex. Some Table Fields are left empty)
* When EZ Map Keys for Tables are used they must always start after a table's header row
* Typos (ex. missing braces)


Why is my Table row tall?
Import Styles uses the properties of first non-header row of a table to format other rows in the same table. Please adjust your column widths and try again.

Do you support import for other form templates?
Currently, we only support import for Invoice & Estimates templates in US Region, but we’re exploring other form types to support as well.

I need more data fields to be mapped
EZ Map Field catalog lists all data that can be mapped from QBO. Fields not present in this catalog can't be mapped into Templates. Please provide feedback through help widget to request for more fields


Best answer by LisaNullar


Reference this list while mapping your fields to decide exactly what information you want in your style, and where you’d like to put it.


Standalone Fields – Company Information

These fields contain your company information and should not be placed inside of tables. Since this information doesn’t change often, we recommend that you enter this information directly into your template as static text.


QuickBooks Field

Field Description

Company Name

Your company name from settings

Company Address

Your company address from settings

Company Tax Identification Number

Your company Tax ID from settings

Company Business Identification Number

Your company Business Identification Number from settings

Company Email

Your company email

Company Phone

Your company phone number

Company Website

Your company website


Standalone Fields – Customer information

These fields contain information about your customers, and should not be placed inside of tables.


EZ Map Field

Description

Can be used for

<customername>

Customer name

Invoice & Estimates

<billingaddress>

Billing address

Invoice & Estimates

<duedate>

Due Date/Expiry Date

Invoice & Estimates

<billingtaxnumber>

Customer's Tax Registration number

Invoice & Estimates

<shippingaddress>

Shipping address

Invoice & Estimates

<shipdate>

Ship date

Invoice & Estimates

<shipvia>

Delivery/Ship via information

Invoice & Estimates

<trackingno>

Tracking number

Invoice & Estimates


Invoice Fields

Fields below are other common Scalar Fields (non-repeatable fields) which apply to Invoices

EZ Map Field

Description

Can be used for

<message>

Message displayed in invoice

Invoice & Estimates

<duedate>

Due Date

Invoice & Estimates

<invoiceno>

Invoice Number

Invoice & Estimates

<date>

Invoice Date

Invoice & Estimates

<terms>

Terms

Invoice & Estimates

<custom1>

Custom Field 1

Invoice & Estimates

<custom2>

Custom Field 2

Invoice & Estimates

<custom3>

Custom Field 3

Invoice & Estimates

<purchasesalelocation>

Place of Supply (POS)

Invoice & Estimates

<exchangerate>

Exchange Rate

Invoice & Estimates


Activity Table Fields

These fields are part of the activity table that make up the body of your invoice.


EZ Map Field

Description

Can be used for

<srno>

Row number

Invoice & Estimates

<item>

Item/Product/Service

Invoice & Estimates

<itemdescription>

Item, Product or Service Description

Invoice & Estimates

<amount>

Amount/Line total

Invoice & Estimates

<qty>

Quantity

Invoice & Estimates

<rate>

Rate/Price

Invoice & Estimates

<servicedate>

Service date

Invoice & Estimates

<lineitemdiscount>

Discount

Invoice & Estimates

<tax>

Tax/Taxes

Invoice & Estimates

<sku>

SKU

Invoice only

<uqc>

Unit Code/UQC

Invoice only

<itemclassificationcode>

HSN/SAC

Invoice only


Tax Summary Fields

If you display tax summary on your invoices, use these fields to map your template.


EZ Map Field

Description

Can be used for

<taxrate>

Tax rate

Invoice & Estimates

<taxamount>

Total tax amount

Invoice & Estimates

<taxhomeamount>

Total tax amount in home currency

Invoice & Estimates

<nethomeamount>

Net amount in home currency

Invoice & Estimates

<netamount>

Net Amount

Invoice & Estimates


Account Summary Fields

If you display account summary on your invoices, use these fields to map your template.


EZ Map Field

Description

Can be used for

<accountsummaryamount>

Account summary amount/balance

Invoice only

<accountsummarydate>

Account summary date

Invoice only

<accountsummarydescription>

Account summary description

Invoice only


Subtotal Fields

These fields make up the subtotal section of your invoice. It is important to note that these sections must be part of a separate table and cannot be placed in the same table as your Activity Table. It’s important to map these fields carefully to ensure the accuracy of your generated forms. 


EZ Map Field

Description

Can be used for

<amountdue>

Total amount due/Balance due /Account balance

Invoice only

<dueamountinwords>

Amount due in words

Invoice only

<subtotal>

Subtotal

Invoice only

<discountbeforetax>

Discount before tax

Invoice only

<discountaftertax>

Discount after tax

Invoice only

<totaltax>

Total tax/taxes

Invoice only

<shippingcharge>

Shipping charges

Invoice only

<total>

Invoice total due

Invoice only

<amountpaid>

Amount Paid/Payment

Invoice only

<deposit>

Deposit/Pre-payment/Down payment

Invoice only

<totalofnewcharges>

Total Of New Charges

Invoice only


19 replies

March 22, 2019

Thanks for joining this thread, JamesCrozier.


Allow me to chime in for a moment and share some information about the issue you’re currently experiencing with the sales templates.


We have received reports from some customers that the invoices they created from estimates are displaying differently compared to their imported templates. Our engineers are working hard to come up with a resolution as soon as possible.


I suggest reaching out to our QuickBooks Online Customer Team to add your company to the notification list of affected users. You will also receive an email notification once there’s progress.


To reach them:


  1. Go to Help at the top, then click on the Contact Us link.
  2. In the How can we help? window, enter contact support in the field box.
  3. Choose a way to connect with us.
  4. Select Start messaging/We'll call you.

Rest assured, I'll keep you posted here in this thread for any updates available.


For future reference, check out this link with detailed information on how to create and use a custom form style.  


That should point you in the right track.


I appreciate your patience while we look into this. If there’s anything else I can help you in QBO, post a comment below. I’ll be right here to assist you further.


March 25, 2019

Exactly the same case here:

When I convert Estimate to Invoice, the template reverts back to the standard one.


This is awful bug, since this is extremely important in order to streamline invoicing process.


Thanks

Wajdy

AlcaeusF
March 26, 2019

Hello there, @Wajdy.


Thanks for joining this conversation. Allow me to step in for a moment and share some update about this ongoing issue.


Currently, our Product Engineers are continuously working on resolving this issue as soon as possible. While we don't have a firm timeline for when this investigation will be resolved, I highly contacting our Phone Support team. They have tools that can check and add your account to our list of affected users.


Once added, you'll receive an email notification once the investigation is done with a resolution. I'll also update you in this post as well.


You can use the steps provided by my colleague above to reach them, or you can also visit this article: Contact the QuickBooks Online Customer Support team.


Thanks for your understanding and patience while we look into this. Please post again or leave a comment should you have any follow-up questions. I'm always here to help you out. Take care and have a good one!

vpcontroller
March 27, 2019

Let me also chime in and allow me to put this in some perspective.


This DOCX import feature was originally introduced sometime in August of 2015, like nearly four years ago now. (Notice this one is still at QuickBooks Labs to turn on???)


Since then, they have added so many new sales functions in QBO, recent big feature improvement is, of course, Progress Invoicing. And more on the Products/Services side.


But I've not heard of even single improvement (maybe few bug fixes) they've done in the last few years related to this DOCX import style. It seems like this import tool is nearly obsolete now. There is no more WOW factor on this one!


March 27, 2019

@vpcontroller 


Out of curiosity, what kind of improvements to this feature would you want to see?


As it is now, its basically a template that offers all existing fields that can be mapped to a field QBO uses on invoices.  You're only limited by how creative you can be in MS Word.


What type of improvements would you like to see to this feature?

April 1, 2019

I am having the same issue with my invoice all scrambled up when I email them or want to print them. I have left two times this case with QB team to be figured out and I have heard nothing. I cannot send an invoice at this point. I need to have this fixed. Who can help me?

April 16, 2019

It is telling me my limit for invoice templates is 25. I have a different invoice for each customer. How do I create more than 25?


Thank you,

Heather

Angelyn_T
April 16, 2019

Hello there, @194812.


Please allow me to join the thread and help share additional information about importing invoice templates in QuickBooks Online (QBO).


Yes, the template limit is only 25 styles. When you reached the said limit, you'll need to delete an existing style to create a new one. This is how QBO works as of the moment. If you have more than 25 customers and each customer has a different template style, the only option is to delete the other template and import a new one.


In addition, you also have the option to customize the template in QBO. For additional reference, you may check this article: How to customize invoices, estimates, and sales receipts.


Don't hesitate to add a post/comment below if you have any other questions about templates in QBO. I'll be always here to help  you!

April 16, 2019

Is there an upgrade available to increase this number?

December 6, 2020

We were using this feature and sometime in early 2019 it stopped working. QBO support said that QBO were not going to allow this feature anymore. But I see that feature still available in QBO under Settings (Gear Icon). I would like to know if we can still customize using the .docx format.

MichelleBh
December 6, 2020

Hi, @GBE


I'll share some information and workaround about using the .docx format in progress invoice in QuickBooks Online (QBO). 


Yes, you can still customize and use the .docx format in your progress invoice. What you'll need to perform is to delete and recreate the progress invoice, not from the estimates. Please make sure that you create the invoice separately, not from the estimate. 


Sample screenshots for the separate transaction: 


To delete here's how: 


  1. Go to the Sales tab, then choose Customers
  2. Locate the separate invoice created. 
  3. Hit More on the bottom part, then tap Delete


You can also click the blue linked transaction(s) to see the invoices you’ve already created on the original estimate. 


Additionally, run the Estimates & Progress Invoicing Summary by Customer report. This way, you can review the complete list of all estimates and connected progress invoices. Then customize it to show the exact customer's data. 


Please browse through this article about handling your customer's transaction and other related topics: Sales and customer.


You can count me in if you need anything else. I'm glad to help.

June 23, 2021

How do I customize an invoice or import invoice to self-employed quick books online?

JoesemM
June 23, 2021

Thanks for taking the time to post your concern here in the Community, @RMG3.


Importing invoice from QuickBooks Online to QuickBooks Self-Employed is unavailable since they are different QuickBooks products. You can only import transactions from QBO to QBSE using.CSV file and have the option to manually add them.


In case you need to import transactions into QBSE, you'll need to check out this article on how to export list data in QBO. Once done, you can now import your. CSV file into QBSE. Here's how:


  1. Select the Gear Icon at the top.
  2. Choose Imports.
  3. Click Imports old transactions on the right for the account you want the transactions to belong to.
  4. Follow the instructions onscreen to finish importing your data.
  5. Select import.


For additional reference, you can check this article: Import transactions from other sources.


Also, in QBSE, you only have one set of customization settings for your invoices. Once you customize, the update will apply to all of your invoices going forward. Let me show you how.


  1. From the left menu, select Invoices.
  2. Select Create Invoice or Edit an existing one.
  3. Click the Customize button and edit the necessary details.
  4. Hit Save.

You can learn more about setting up your invoice preferences through this article: Create invoices in QuickBooks Self-Employed. It provides a guide on how to turn on online payments to let your customers pay their invoices electronically.


If you're using QuickBooks Online, refer to this article on how to manage your invoice transactions:


Just in case you want to learn how to track sales tax in QBSE, you can read through this article for more information: Learn how sales tax works in QuickBooks Self-Employed.


If you need additional help, feel free to reach out to me. I'm always here to provide further assistance with anything QuickBooks-related. Have a good one!

September 13, 2021

When I create an invoice with many items it places my table on the second page and leaves the front page blank.


Is there a way to split the table across multiple pages as per the standard template?


Thank you!

September 13, 2021

Welcome to the Community, @Zestom.


I'll be happy to share an idea to help you create an invoice and continue the table from the first to the second page.


When creating an invoice with many items, the table should show from the first page to the second page. For unexpected behavior, I'd recommend logging in using a different supported browser.


Also, you may try using a private browser. Follow the steps below:


  • Chrome: press Ctrl+Shift+N
  • Safari: press Command+Shift+N
  • Firefox: press Ctrl+Shift+P
  • Microsoft Edge: press Ctrl+Shift+P


If using a private browser works, you can now clear your browser's cache to refresh its preference.


Here's how:

  1. Open Chrome.
  2. Click More.
  3. Choose More Tools, then Clear browsing data.
  4. Add a time range. Select All time to delete everything.
  5. Check the boxes next to Cookies and other site data and Cached images and files.
  6. Select Clear data.


I'm also adding this article for more information about customizing transactions: Customize invoices, estimates, and sales receipts in QuickBooks Online.


Let me know if you have more questions about creating an invoice. I'll be happy to help. Have a good one!

September 20, 2021

Unfortunately, Page 1 is still breaking. But it breaks the table up perfectly from page two over page 3 if I add even more lines.


Any ideas as to why it would work fine from page 2 but not page 1?

September 27, 2021

     QuickBooks Labs

       1.  Click on the Gear icon in the upper right corner and select QuickBooks Labs  


When entering there is no option to import a STYLE

September 27, 2021

Thank you for posting here in the Community, @ANAS92.


Allow me to provide some insights to get this matter sorted out. so you can now start importing invoices in QuickBooks Online.


The option to import custom styles is only visible to all the admin users. If you're currently using standard user access, then this is the reason the option isn't available. 


To fix this, I recommend logging in as an admin so you can import the templates. Here's a link that you can visit to learn more about the different user access grants in QuickBooks Online: Learn how to manage who can access your books in QuickBooks Online.


For more information about importing an invoice or estimate template, you can also read this article: Import custom form styles for invoices or estimates


Let me know if you have more concerns about importing templates. We're always delighted to assist. 

December 13, 2022

Is any way to import the cumstom style invoice? does not show up in the Quickbook lab anymore


February 3, 2023

I can see only theme tab in quikbooks lab. How can i solve it?

anyone Please assist me please.

Adrian_A
February 4, 2023

Hi there, Hussain.


I'm here to share more information about the features under QuickBooks Labs.


As of June 2021, the features under QuickBooks Labs, except QuickBooks Themes, are no longer available. Alternatively, we still have some great templates you can make use of when customizing your invoice. You can utilize the footer options and use other spaces for things like signatures. Otherwise, you can look for 3rd party apps to create your invoice templates. 


Feel free to use this link to help you manage your sales forms: Customize invoices, estimates, and sales receipts in QuickBooks Online.


I'll be around if you need help managing your sales form.

June 14, 2023

Hi

I don't have QuickBooks Labs in my tab.  Any idea why?

June 14, 2023

Thanks for joining this thread, suzannek1.


QuickBooks Labs is used for Intuit to test new features early. It's possible you're not seeing it presently because there may be no features Intuit's currently testing.


I can certainly understand how an ability to access the QuickBooks Labs option could be useful and have submitted a suggestion about it as of today.


You can also submit your own feedback using the steps in GebelAlainaM's post. Your feedback's definitely valuable to Intuit. It will be reviewed by our Product Development team and considered in future updates. You can stay up-to-date with the latest news about your product by reviewing Intuit's Product Updates webpage.


Please feel welcome to send a reply if there's any additional questions. Have a wonderful Wednesday!